How to Make a Fourteenth Century Cotehardie
|
|
|
The Garment:
The cotehardie is simply a description of a type of surcote. It literally means “bold coat” and therefore was typically an outer garment of finer cloth than the cote or doublet and was often simply called a surcote. However, typical reenactment usage of the term indicates a specific garment from the middle of the 14th century onward.
The purpose of the outermost garment in this period of medieval fashion was to be expressive and feature bold cuts, colors, and stylings. It is not, then, a single definable style of garment but rather changes with time over the 14th and 15th centuries.
Make the cotehardie out a fine quality wool. A broadcloth felted wool will be ideal as it will allow dagging the garment and will be sturdy enough to be used for self-fabric buttons. The cotehardie can be lined but need not be, especially when it is close fitting.
In the 1330-1360s, when worn over a tunic or doublet, the cotehardie will typically be either sleeveless or have short sleeves. During the 1340s, tippets (pendants/streamers hanging from the short sleeves) were fashionable. In the 1340s it is most common for a cotehardie to button down the front across the chest. However, as the fashion developed, it became more common, but not universal, for the buttons to extend down the entire front of the garment. This was in part due to the tighter fits and higher hems which came in vogue. These changes made it impossible to pull even the skirts over the head and therefore the cotehardie needed to be button closed.
In addition, the garment was frequently dagged at the hem and often done to match the hood in design. The cotehardie can be worn over a doublet or a tunic and might reach to the knees or, by the 1360s, might reach to only the mid-thigh.
To the extent that such fine distinctions can be made between a surcote and a cotehardie, the surcote would typically be long tunic that reached to the mid-calf or the ground. It was not unfashionable to wear such a garment even as other skirts had rising hemlines. Instead, the longer garments tend to be signs of maturity, authority, and distinction in occupation.
Women adopted the basic stylings of the cotehardie, including the sleeve tippets, buttons, and close fit around the torso. However, because all women’s skirts reached at least to the ground, they did not adopt the higher hems. For the same reason, dagging at the bottom of the cotehardie skirt was not seen among women.

Roman d'Alexandre, Oxford, Bodl. Lib., Bodley MS 264, fol. 128v
|
|
|
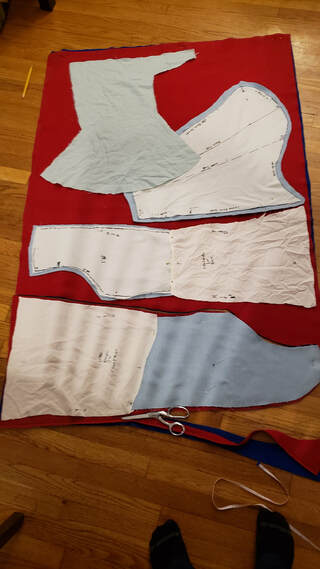 After cutting the doublet pattern out, I laid that on the cotehardie fabric, added the bottom extensions for length, and cut giving 1-2 cm allowance for ease.
First Thing:
Before making this garment, make sure that you have made an under linen shirt and a doublet or suitable cote. If you have a very baggy under linen shirt, consider making a tighter fitting shirt to keep it from bunching up.
The Pattern:
The good news is that if you have made a personal block based on the Making a Medieval Garment Pattern page, then you essentially have your pattern for the cotehardie with only slight alterations.
I made a late 1340s early 1350s style cotehardie with short sleeves and sleeve tippets and a mid-thigh skirt.
Earlier cotehardies of the 1330-1340s had longer fuller skirts while later cotehardies had even shorter skirts than mine. Determine your period and make the skirt accordingly.
The length of the skirt will determine how you alter your personal block pattern. Determine how much extra length you need from the bottom of the personal block pattern and lengthen accordingly. Also be sure to flare the skirt slightly from the block pattern. You may need to add gores to the skirt depending on the style of cotehardie you are making.
You will also want to add approximately 1-2 cm of ease to the personal block pattern. Remember, this garment is an out garment and will be worn over a doublet which is based on the personal block itself. Also be sure to lower the under arm slightly for the same reason.
I cut the cotehardie pattern out by laying the cut doublet fabric over the cotehardie fabric, adding the skirt length piece, and then giving 1-2cm for ease. The picture shows how I put my hood pattern on top. I actually didn't even make a special sleeve pattern. I just did it freehand.
Determine whether your cotehardie will button to the belly or all the way down the skirt. Earlier cotehardies button only to the waist while later, tighter fitting examples show buttons all the way down the body. This will also help determine the cut of the skirt.
The buttons may become wider spaced below the waist. This is especially true of women’s skirts where buttons did not reach to the floor, but would extend to the hips. The wider spacing can help the flow of the skirt and give more ease.
You do not need to add extra width to accommodate the buttons. The buttons attach to the right side and on the edge of the cotehardie. Buttonholes should be close together. No more than 3-4 cm apart and can be so close that they touch. Make some mock ups to determine what size you want and what size to make the buttonholes before cutting into the fabric.
If you are making sleeve tippets, use your sleeve block and add the tippets to the underarm. You need to end the sleeve just above the elbow and then add the desired tippet shape.
Later cotehardies often had short sleeves with attached sleeve streamers rather than tippets.
If you are making a long-sleeved cotehardie, consider wearing a sleeveless doublet so the buttons of the doublet don’t disturb the line of the cotehardie’s tight sleeves. The long sleeves of the cotehardie would have buttons instead of the doublet.
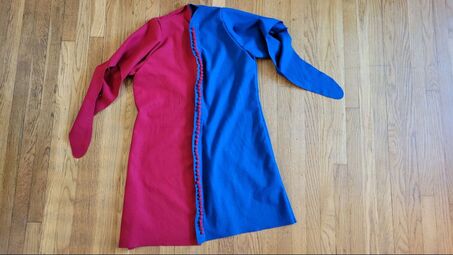
Parti-colors: Parti-colored cotehardies were popular among musicians and performers. However, in the 1340s and onward, they also become popular among the fashionable elite.
Parti-colored outfits in this period are almost always divided horizontally and not vertically with the left side of the garment one color and the right side the other color. To make a parti-colored outfit, you will need to cut a front and back and one sleeve in each color.
Later cotehardies often had short sleeves with attached sleeve streamers rather than tippets.
If you are making a long-sleeved cotehardie, consider wearing a sleeveless doublet so the buttons of the doublet don’t disturb the line of the cotehardie’s tight sleeves. The long sleeves of the cotehardie would have buttons instead of the doublet.
Parti-colors: Parti-colored cotehardies were popular among musicians and performers. However, in the 1340s and onward, they also become popular among the fashionable elite.
Parti-colored outfits in this period are almost always divided horizontally and not vertically with the left side of the garment one color and the right side the other color. To make a parti-colored outfit, you will need to cut a front and back and one sleeve in each color.
Making Up:
Garment assembly should be relatively easy. Sew the two back pieces together and then sew the front pieces to the back piece. If you are doing buttons up the entire front, the front will obviously not be sewn together. If you are only doing buttons to the waist, you can sew the front together up to the point where you will add the buttons.
If you are lining the cotehardie, now is the time to sew in the lining.
If not, next, set in the sleeves and you should have the basic garment made up.
Again, if you are working from a well-designed personal block, this will all be relatively easy to assembly and should fit well. If it doesn’t make any necessary changes to ensure clean lines and a fit that follows the contours of the body.
Buttons:
The time-consuming part of the project will be the buttons….
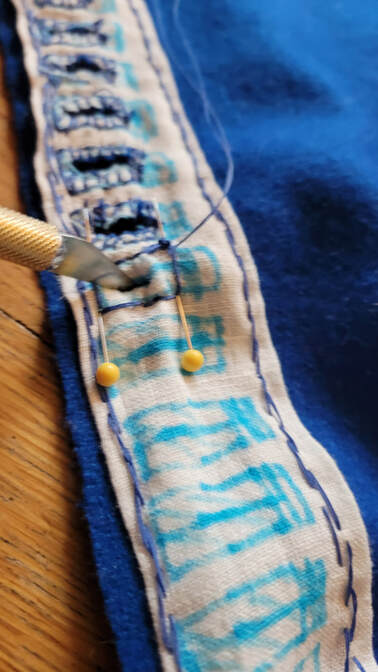
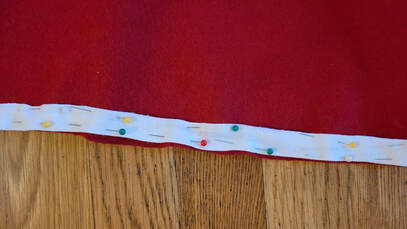
Since my cotehardie is unlined, I added a strip of white linen to each side of the front opening for the buttonholes and the buttons to anchor to. This will help the longevity and durability of the buttonholes and buttons. However, if I had to do it again, I would use a strip of the same fabric as the reinforcement. It would have been less noticeable and cleaner looking I think. However, as it is, it is not very noticeable and only if the garment is unbuttoned.
Regardless, I used the linen and used a back stitch to anchor it in place and reinforce the edges.
For the buttons I made a few mockups with different size buttons and buttonholes until I came to a good look and feel. The buttons themselves almost touch and the buttonholes are only about 1 cm apart on center.
Decide what looks good and is doable before cutting into your garment.
After you’ve determined your size and spacing, mark the buttonholes on the fabric. I used a washable fabric marker that comes off when it gets wet. This was better than chalk for this step because I needed the lines to stay in place for a long time.
The time-consuming part of the project will be the buttons….
Since my cotehardie is unlined, I added a strip of white linen to each side of the front opening for the buttonholes and the buttons to anchor to. This will help the longevity and durability of the buttonholes and buttons. However, if I had to do it again, I would use a strip of the same fabric as the reinforcement. It would have been less noticeable and cleaner looking I think. However, as it is, it is not very noticeable and only if the garment is unbuttoned.
Regardless, I used the linen and used a back stitch to anchor it in place and reinforce the edges.
For the buttons I made a few mockups with different size buttons and buttonholes until I came to a good look and feel. The buttons themselves almost touch and the buttonholes are only about 1 cm apart on center.
Decide what looks good and is doable before cutting into your garment.
After you’ve determined your size and spacing, mark the buttonholes on the fabric. I used a washable fabric marker that comes off when it gets wet. This was better than chalk for this step because I needed the lines to stay in place for a long time.
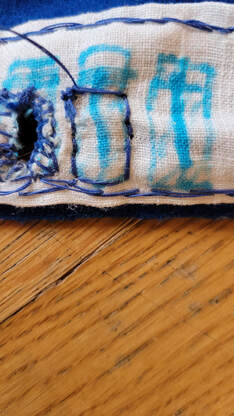
To make the buttonholes, you have a few options. The most historically attested way to do this would be to use a chisel and cute the buttonhole and oversew the edges to prevent fraying or tearing. You can buy such chisels and supposedly you will get a better-looking buttonhole. Also, apparently medieval buttonholes were not terribly well oversewn on the edges and were not as sturdily made as the buttonholes we expect to see.
I did not have a chisel and I wanted a well secured buttonhole that would never give out, so…
I did not have a chisel and I wanted a well secured buttonhole that would never give out, so…
|
|
|
|
|
|
|
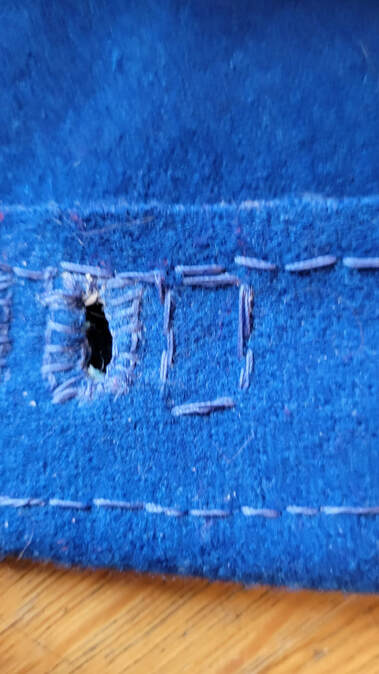
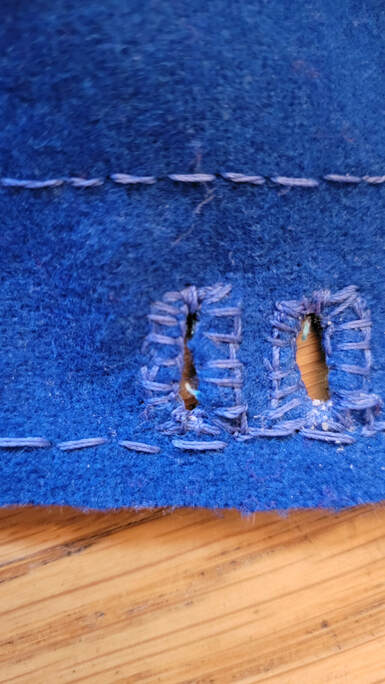
Anyway, I outlined my buttonhole, used an x-acto knife to cut the hole and then used a blanket stitch to oversew the edges.
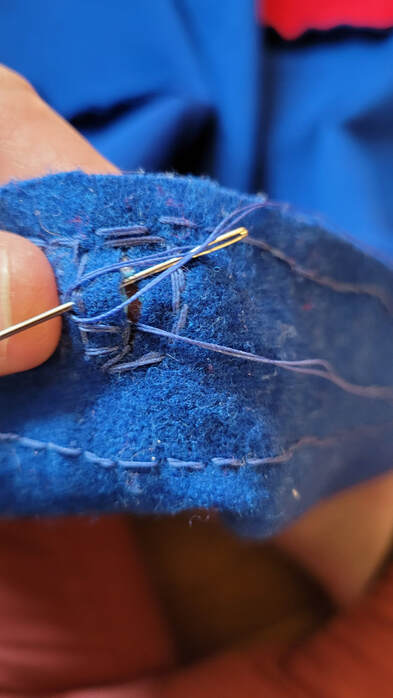
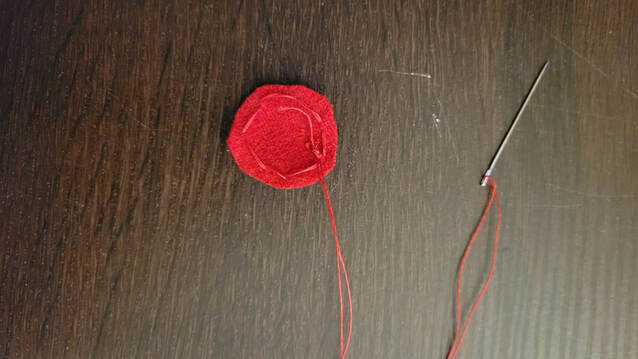
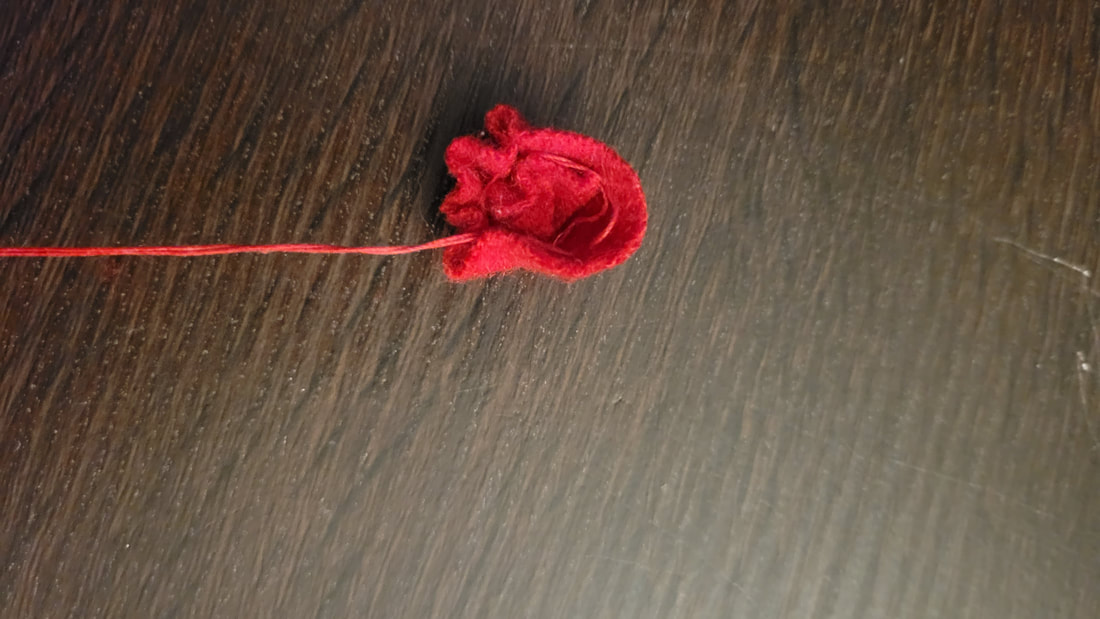
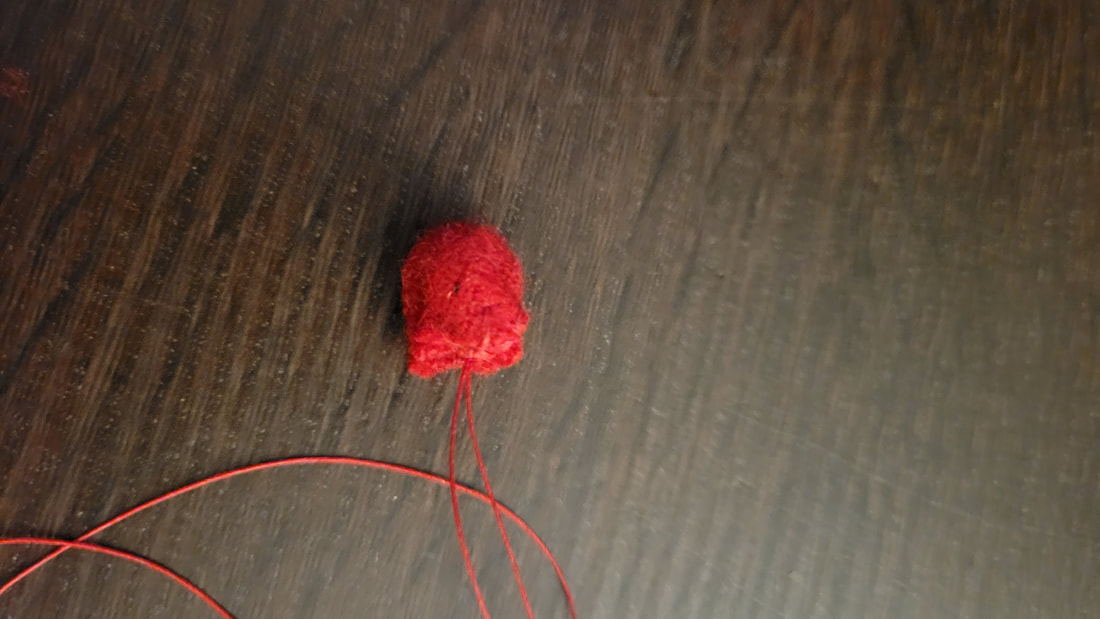
To make the buttons I cut out circles of the red wool fabric (the side the buttons were sewn to) and then stuffed them with extra bits of scrap fabric. This method is good for making self-fabric ball buttons which were popular in the 14th century. I started with the circle, started stitching a running stitching through a stitch at a time. As I did that, I turned the edge of the button in and pulled the thread so the button would start to “collapse” in on itself. I filled it with scrap fabric and then pulled the thread tight, so the button enclosed the scrap.
To make the buttons I cut out circles of the red wool fabric (the side the buttons were sewn to) and then stuffed them with extra bits of scrap fabric. This method is good for making self-fabric ball buttons which were popular in the 14th century. I started with the circle, started stitching a running stitching through a stitch at a time. As I did that, I turned the edge of the button in and pulled the thread so the button would start to “collapse” in on itself. I filled it with scrap fabric and then pulled the thread tight, so the button enclosed the scrap.
|
|
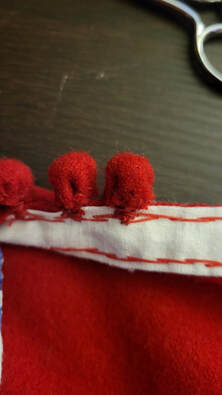
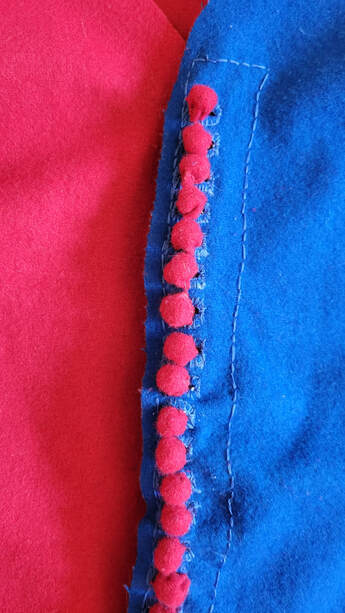
From here, I had a ball button on a piece of thread. So, I immediately put the button in place on the front edge of the cotehardie. To attach the button put it directly in line with a buttonhole. The button itself actually goes on the edge of the fabric, not offset onto the front of the garment at all. Use a few stitches to tack the button down I tried to do a stitch straight down, then one or two to each side to get the button secure. Make sure you create a shank of thread as you go. To do this whip the thread around the anchor points and then stitch back through the button. Repeat this process a few times until the button is secure.
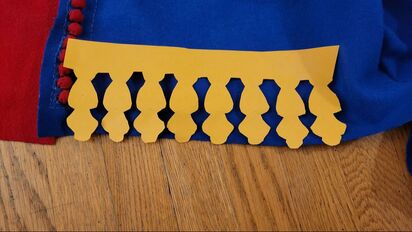 As you can see, I needed to remove some of the bottom buttons to accommodate the dagging.
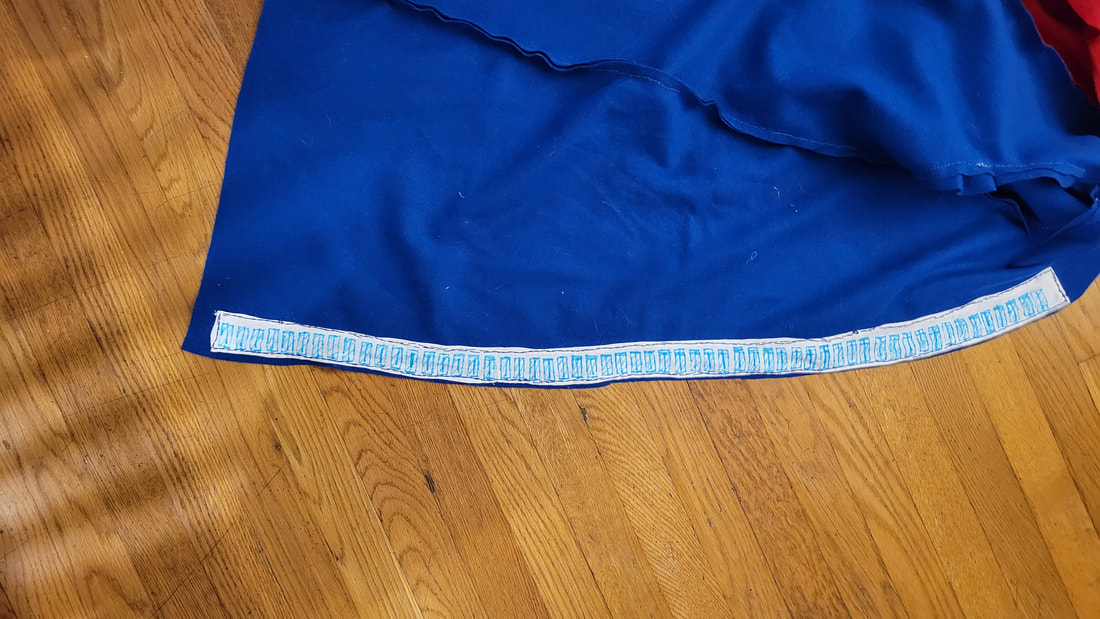
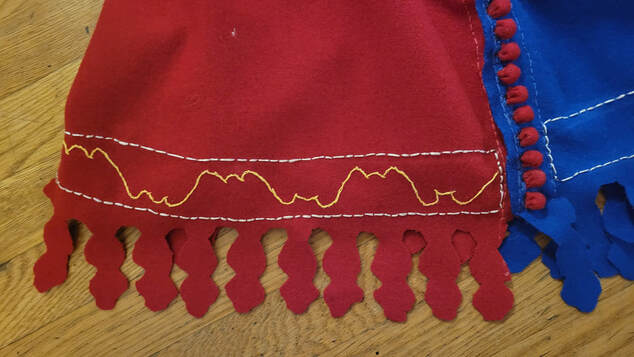
Dagging and Embroidery:
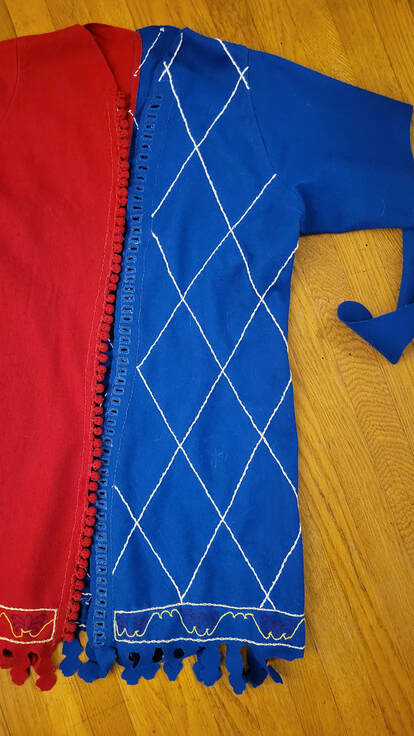
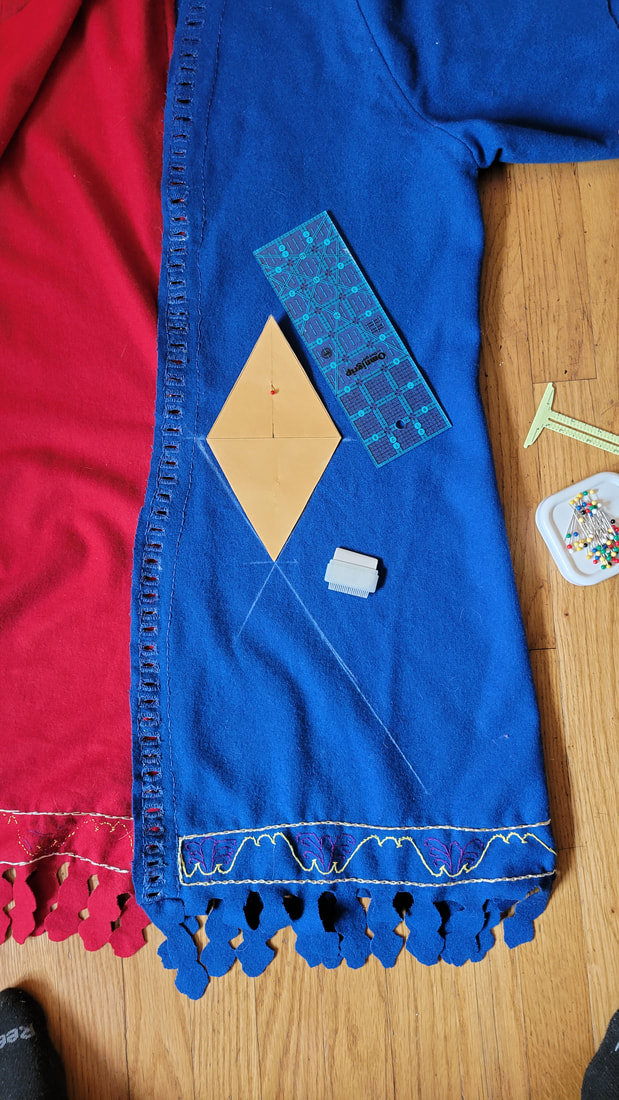
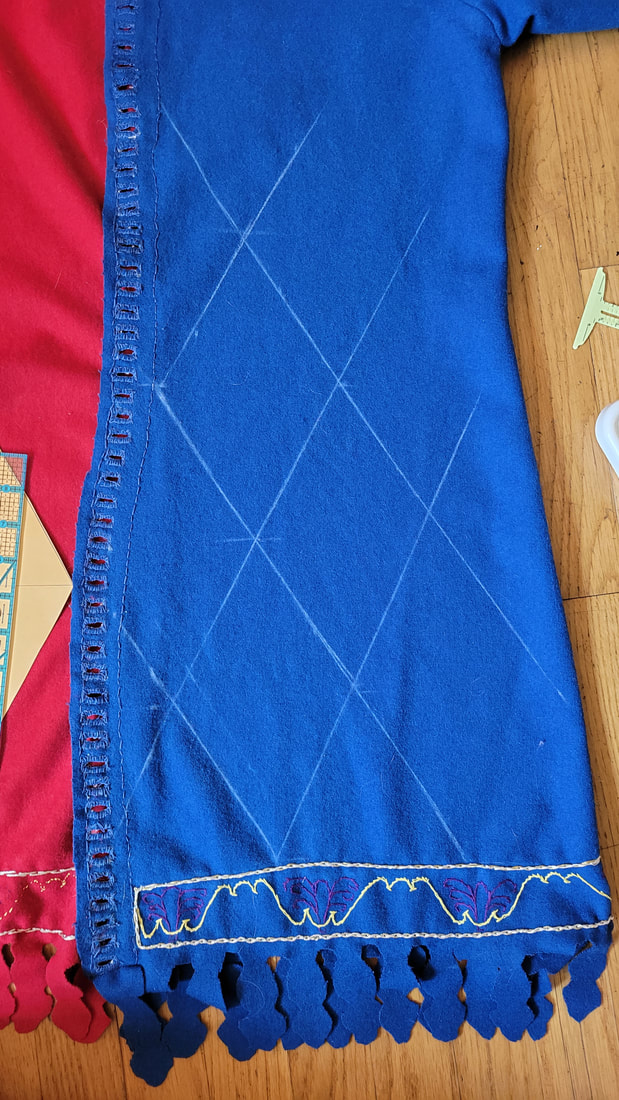
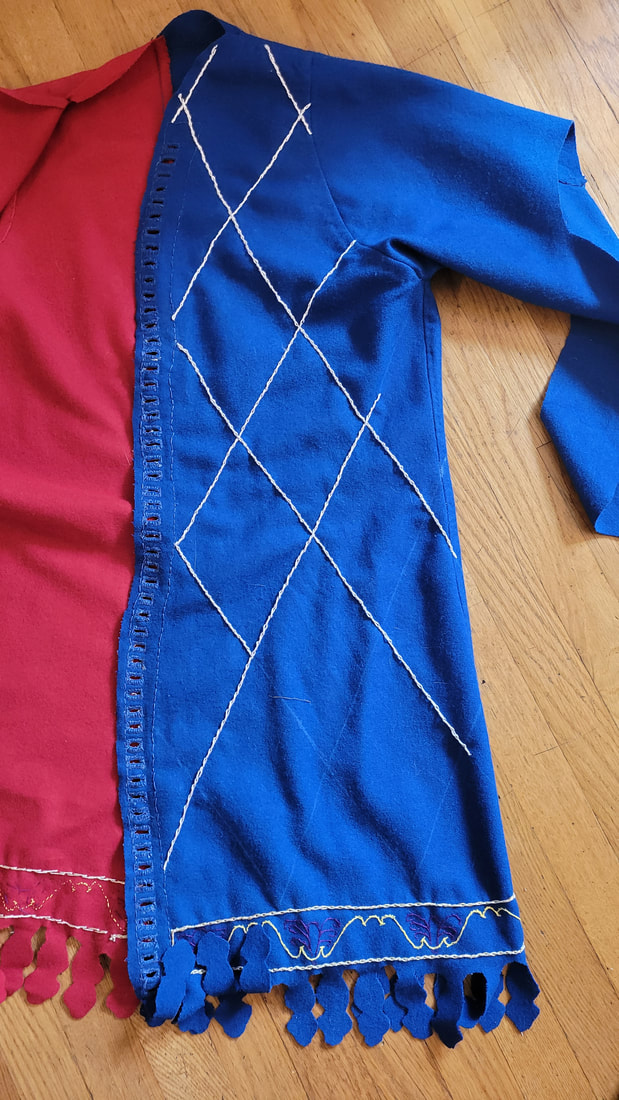
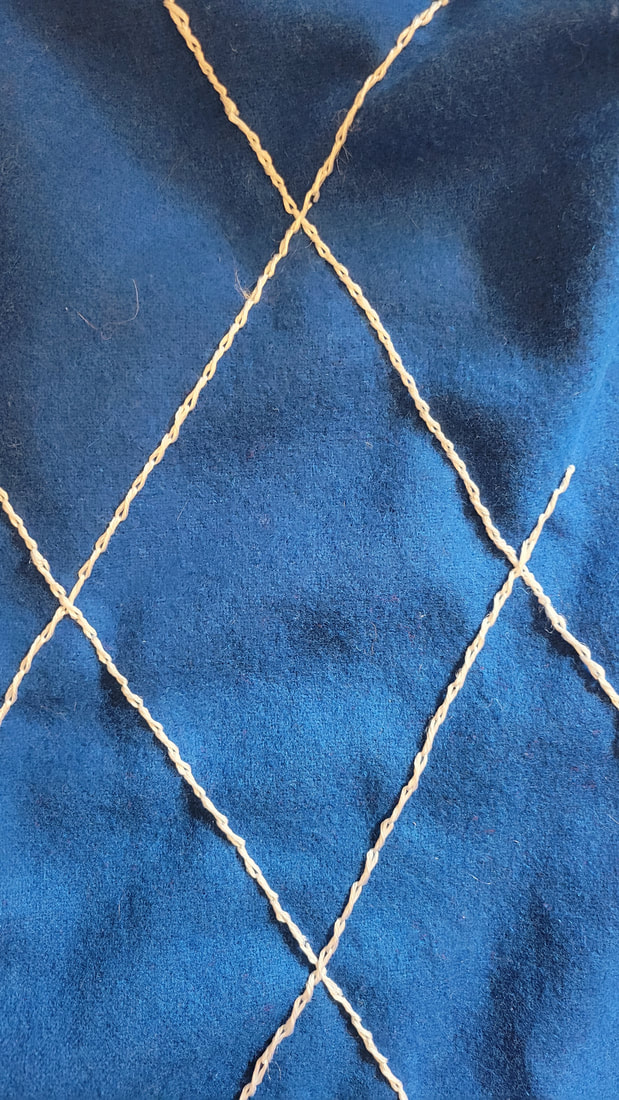
I finished my cotehardies with dagging on the bottom and an embroidery boarder. I also did a diamond pattern embroidery in white embroidery floss on the blue side of the cotehardie.
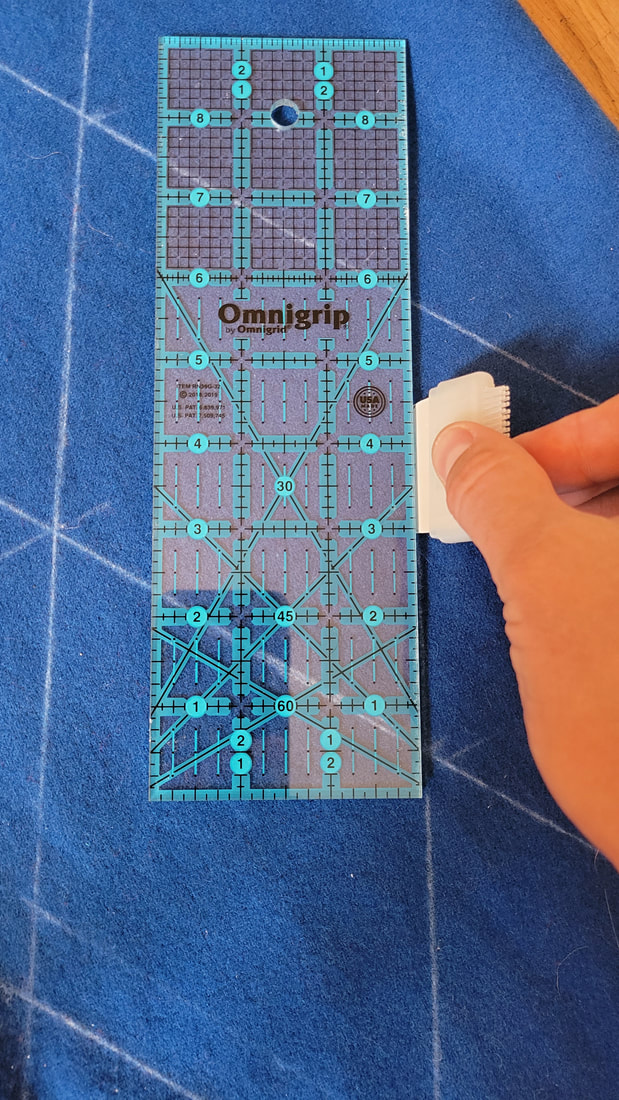
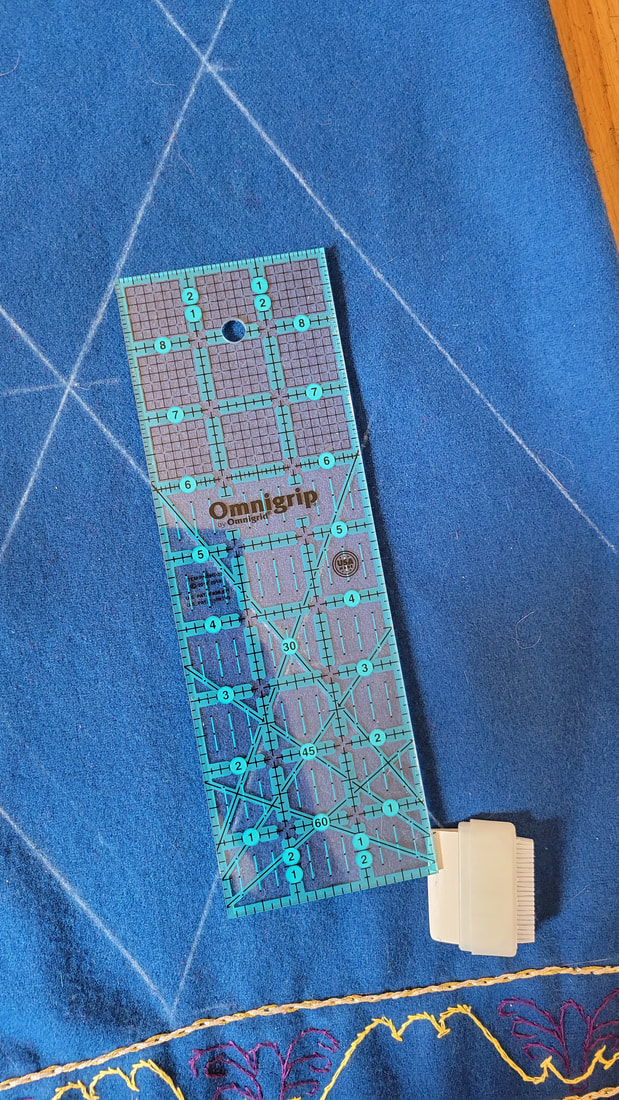
The diamond pattern was actually a lot easier than I thought it would be. I used a sewing angle tool to mark the angles and make straight lines in chalk. Once the entire blue side was marked, I embroidered with white thread.
I finished my cotehardies with dagging on the bottom and an embroidery boarder. I also did a diamond pattern embroidery in white embroidery floss on the blue side of the cotehardie.
The diamond pattern was actually a lot easier than I thought it would be. I used a sewing angle tool to mark the angles and make straight lines in chalk. Once the entire blue side was marked, I embroidered with white thread.
Concluding Impressions:
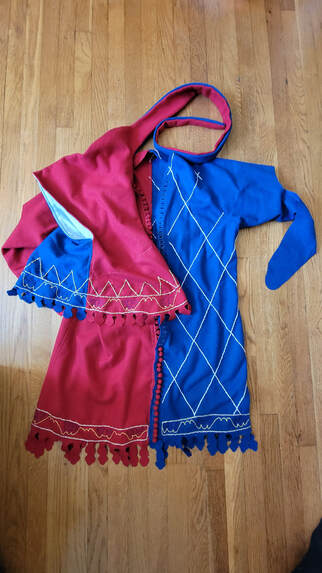
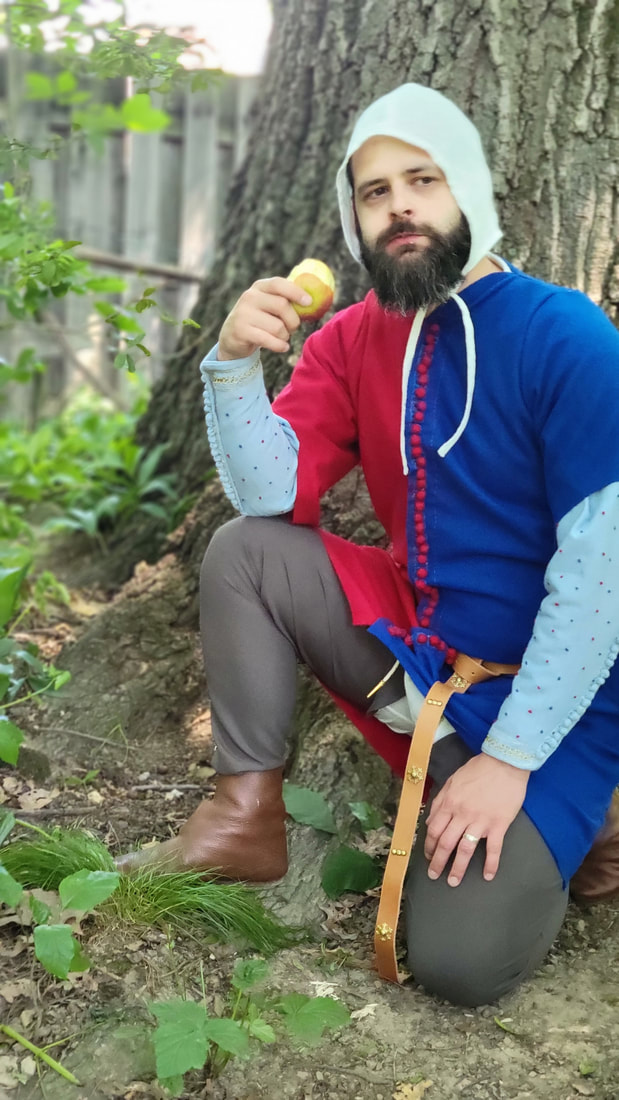
I love the look of the cotehardie, especially with the doublet which has a matching color scheme and the French knot embroidery on the arms of the doublet. The outfit as a whole was meant to be very flamboyant and ostentatious and reflect the transgressive fashion more of the 1340s and 1350s.
There are a few finish issues, such as the tippets. I had intended to line them with fur, but I have never been able to pull the trigger on that decision. I still consider doing it, but It’s been over a year now and I haven’t done anything to it at all.
Another finish issue is that I would not have used the linen for the button hole reinforcement. Instead, I would have used strips of the broadcloth I used as reinforcement. This is minor, and almost not noticeable, but you can slightly see the white linen from certain angles.
Finally, I wasn’t happy with the scale of the dagging on the bottom. I wish it would have been larger and the shape a little more pronounced.
I am very happy with how the diamond embroidery turned out. It was fun to do that step and I think its one little extra detail that makes the outfit stand out.
|
|
|
