Making a Simple Costrel (Leather water bottle)
If you are wanting to dip your toes into the world of leather crafting, a simple leather costrel might be a good place to start. With a simple pattern and a few tools, you can make a pretty neat and useful item to add to your kit.
The Item:
The simple leather costrel I made followed the pattern of a post-medieval costrel. Not many leather items survive from the medieval period, but there is ample evidence that such items were used in the medieval period, including pottery drinking vessels with designs intended to mimic the appearance of leather stitching. (The Medieval Household, 238-239).
Required tools:
To complete this item, you will need waxed leather thread, two leather or embroidery sewing needles. A sharp knife to cut the leather pattern, tools to mark and punch the leather, beeswax or brewers pitch, and a utility knife and stick or branch to make a carved wood plug.
The Item:
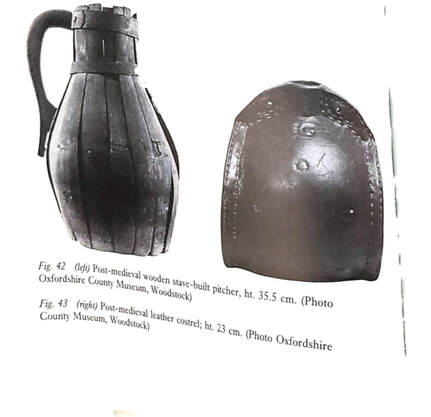
The simple leather costrel I made followed the pattern of a post-medieval costrel. Not many leather items survive from the medieval period, but there is ample evidence that such items were used in the medieval period, including pottery drinking vessels with designs intended to mimic the appearance of leather stitching. (The Medieval Household, 238-239).
Required tools:
To complete this item, you will need waxed leather thread, two leather or embroidery sewing needles. A sharp knife to cut the leather pattern, tools to mark and punch the leather, beeswax or brewers pitch, and a utility knife and stick or branch to make a carved wood plug.
|
|
|
|
Material: I used 3mm veg tanned leather. If I were to do this project again, I would buy a 5mm leather to make it a little studier. However, the 3mm worked fine.
The Pattern: The pattern I followed for the simple costrel was slightly taller than it is wide with a height of 23cm. The original had double lines of stitching, but I opted for one on my simple piece. In fact, the original piece was more inspiration than a direct pattern that I followed. I used this piece as a proof of concept and a practice piece to hone my skills before trying something more difficult. 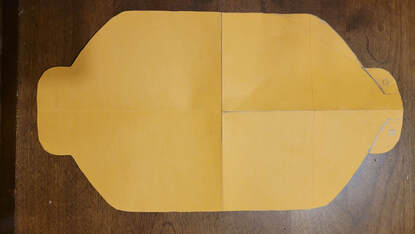
|
|
As you can see, the shape is simple. You can cut and insert a bottom piece of leather to add more volume or you can do what I did and simply fold the leather over and stitch the entire perimeter with a opening for the spout. It has a capacity of about 500 ml or 16oz. I also provided a space to punch the leather and attach leather straps.
|
|
|
Making up:
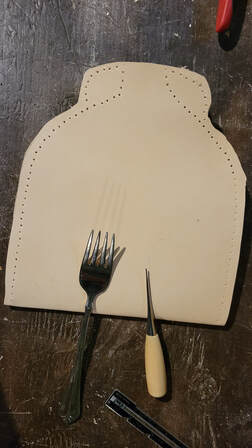
I started by making a pattern following the above dimensions. I used a big 9x12” manilla envelope to cut out the pattern. Once I cut the pattern out, I used the janky leather tools I had lying around – a salad fork and an awl – and I punched the holes around the perimeter.
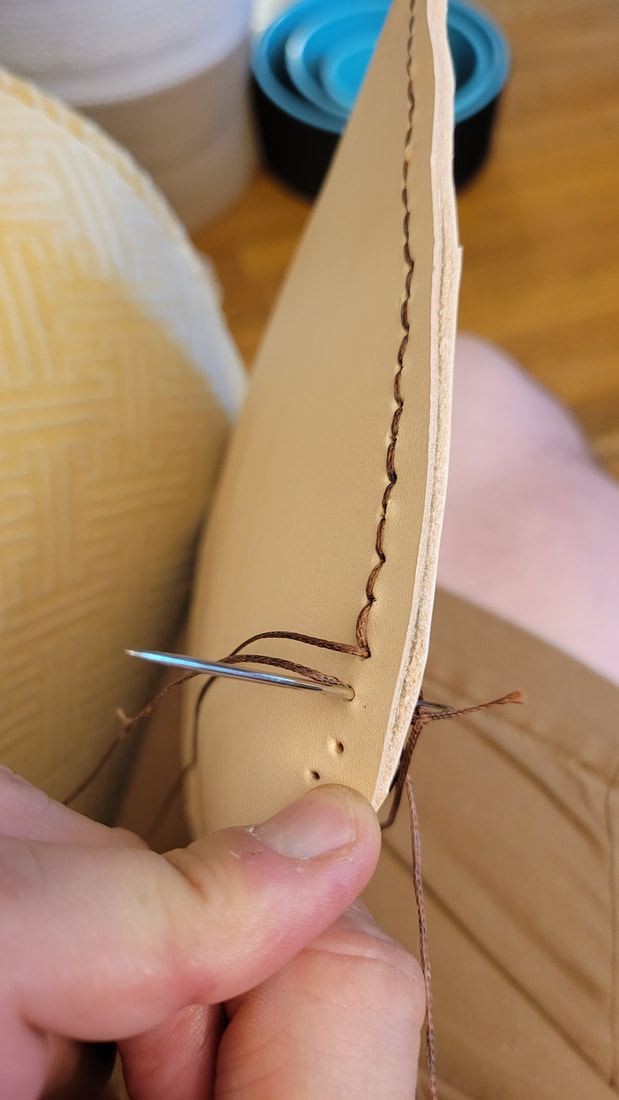
With the holes punched, I used a saddle stitch to sew the piece. A saddle stitch is pretty simple once you get the hang of it and is great for an item like this because you can control the tension. To do a saddle stitch, get a length of thread and attach a needle to each end. A good way to attach the needle is to use the needle to pierce the thread and then pull the loop tight. This will keep it firmly in place and prevent the knot at the end from being too big to pull through the leather.
The next step in saddle stitching is to pull the thread evenly through one hole. Next stitch the next hole with one needle and go through the opposite direction with the other needle. Use an over/under pattern with one side always going over and the other always going under the thread. Keep doing this until you run out of thread or complete the stitch. To finish, you can back stitch a couple of stitches and then knot off your thread.
I started by making a pattern following the above dimensions. I used a big 9x12” manilla envelope to cut out the pattern. Once I cut the pattern out, I used the janky leather tools I had lying around – a salad fork and an awl – and I punched the holes around the perimeter.
With the holes punched, I used a saddle stitch to sew the piece. A saddle stitch is pretty simple once you get the hang of it and is great for an item like this because you can control the tension. To do a saddle stitch, get a length of thread and attach a needle to each end. A good way to attach the needle is to use the needle to pierce the thread and then pull the loop tight. This will keep it firmly in place and prevent the knot at the end from being too big to pull through the leather.
The next step in saddle stitching is to pull the thread evenly through one hole. Next stitch the next hole with one needle and go through the opposite direction with the other needle. Use an over/under pattern with one side always going over and the other always going under the thread. Keep doing this until you run out of thread or complete the stitch. To finish, you can back stitch a couple of stitches and then knot off your thread.
|
|
|

The usefulness of the saddle stitch in this application is that you can control the tension and pull the string tight. This is important because you will need to make the seal as tight as possible to help keep the costrel watertight.
After I stitched the piece, I trimmed the edges to give nice clean lines and to make sure the halves lined up evenly.
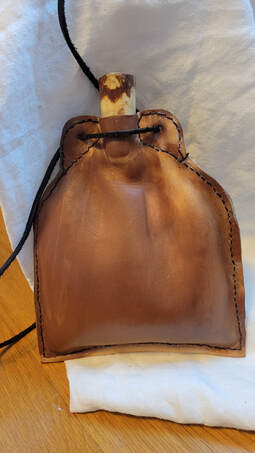
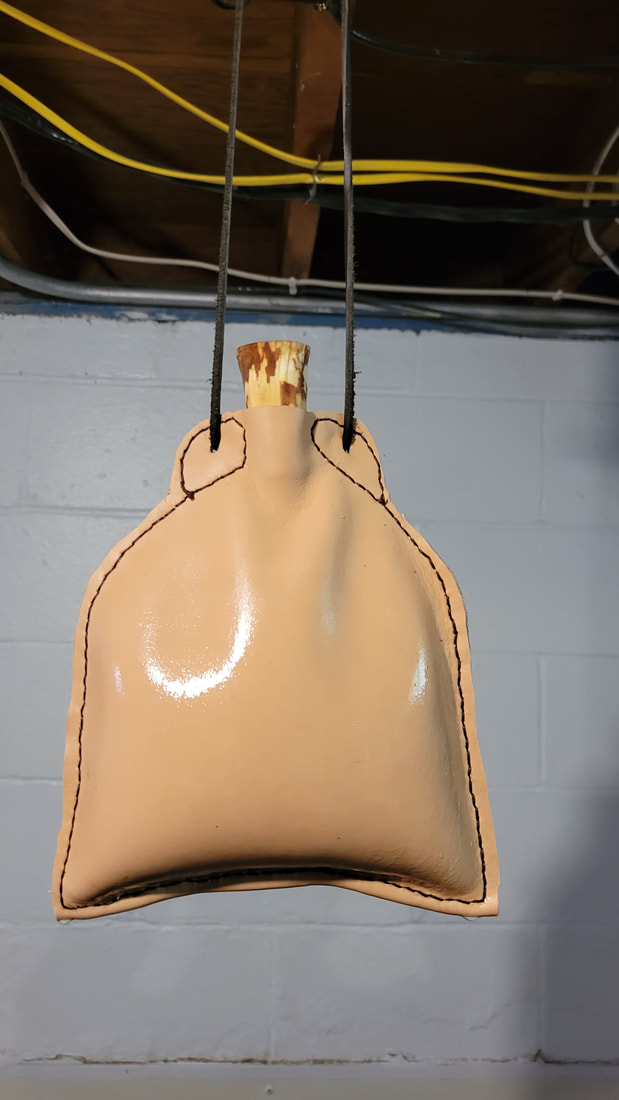
I then used a piece of wood from a tree I cut down and shaped it to appropriately fit in the mouth of the costrel. You can also drill small hole in the plug so you can tie it to the costrel. This will prevent it from falling off and getting lost. Next, I punched the holes next to the spout for the straps.
I then then soaked the piece. While wet, veg tanned leather is moldable and will retain the shape you gave it when it dries. I used a thin, long tool to shape the piece and then I filled it with water to balloon it to size. I hung it up in my basement with the plug in and let the water drain out slowly for the next day or two. It takes two to three days to completely dry.
Once dry, the piece will retain the shape it was in while wet. However, it will still be soft and liable to crushing or smushing out of shape, so be careful with it.
After I stitched the piece, I trimmed the edges to give nice clean lines and to make sure the halves lined up evenly.
I then used a piece of wood from a tree I cut down and shaped it to appropriately fit in the mouth of the costrel. You can also drill small hole in the plug so you can tie it to the costrel. This will prevent it from falling off and getting lost. Next, I punched the holes next to the spout for the straps.
I then then soaked the piece. While wet, veg tanned leather is moldable and will retain the shape you gave it when it dries. I used a thin, long tool to shape the piece and then I filled it with water to balloon it to size. I hung it up in my basement with the plug in and let the water drain out slowly for the next day or two. It takes two to three days to completely dry.
Once dry, the piece will retain the shape it was in while wet. However, it will still be soft and liable to crushing or smushing out of shape, so be careful with it.
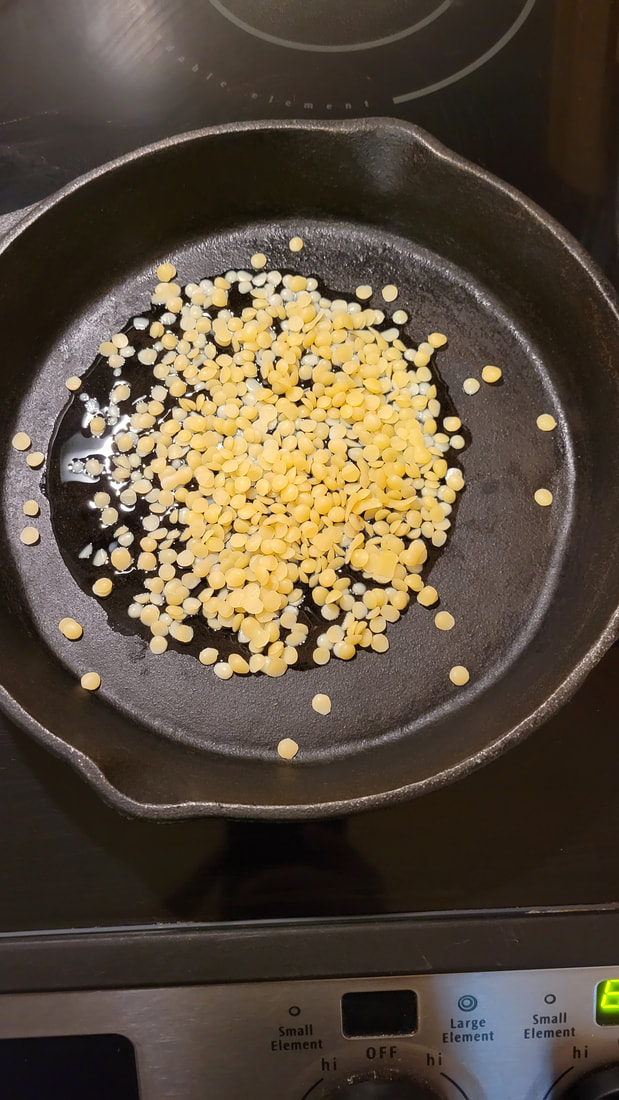
Next, I put my oven on the warm setting. Beeswax melts at about 165F, by warming the costrel before applying the wax, it soaks in easier and does not harden before it has a chance to soak in.
After warming the costrel in the oven for about ten minutes, I then melted beeswax pellets. I first coated the outside of the costrel with the wax and once fully coated, I melted more wax and poured it into the costrel. I did my best to let the wax run over the entire inside of the costrel and gave special attention to the seams. After pouring the wax inside and swirling it around, pour it out and reheat the wax or add more and re-swirl at least one or two more times.
I then let the costrel cool and tested if it was watertight. Luckily it was and I was ready to drink.
Alternative sealing method:
As an alternative to beeswax, you can also use brewer’s pitch, also known as pine resin crystals. I know that Townsends sells some on their website which would be good to use. Brewers pitch is applied in much the same was as beeswax and can also be used to coat the costrel.
Care and maintenance:
Because this is a leather item, do your best to keep it dry between uses. This will help keep the wax coating intact and prevent mold growth in the costrel. Let it dry upside down on a wire rack and to fully air dry before storing.

Concluding Impressions:
I used this as a proof of concept project to make sure that I had the skill and materials to make the costrel watertight. The finished project is simple, but I'm pleased with it. My kids think drinking from a leather water bottle is the coolest thing in the world and ask all the time to use it.
I used this as a proof of concept project to make sure that I had the skill and materials to make the costrel watertight. The finished project is simple, but I'm pleased with it. My kids think drinking from a leather water bottle is the coolest thing in the world and ask all the time to use it.
