Making a Medieval Garment Pattern
 My completed toile used to make my personal block
A personal block is a master pattern based on your measurements. Making one is key to making later period medieval clothing. You will be able to take this master pattern and, with slight adjustments, make later period medieval garb like doublets and kirtles.
By the middle of the fourteenth century, medieval fashion began to include fitted garments such as the doublet, cotehardie, and kirtle, which all require making a personal block pattern.
Making the personal block is essentially making a personal pattern that will be used to create fitted garments. The fashion of the 1340s and beyond requires that a garment be closely fitted and follow the contours of the body. Perhaps the hardest part of reproducing a medieval fitted garment is the armhole for the sleeve. Medieval sleeves fit tighter and higher into the shoulder than modern sleeves and will likely cause some difficulty in fitting. However, if you make a well fitted block, you can be confident that your pattern will yield good results.
I would recommend this project to intermediate to advanced sewers. If you are just starting out or not confident with the basics of garment construction and pattern making, I would wait to do this project.
However, if you feel you have the skills and have made a few items and want a challenge, this will be a great place to start your journey into later medieval fashion. If you struggle to make the personal block and are having difficulties with fittings, with getting the toile to lay properly, or making the sleeves actually fit the armhole, don’t despair. When I started putting tutorials on this website, I did so as a novice. I wanted to help other novices learn the basics so they could make something special of their own.
While I’ve made quite a few pieces since then, I still don’t claim to be an expert, or even advanced. Like many things in life, I’m solidly intermediate. But this project pushed me and made me learn and understand things in a better way. It was hard, it was time consuming, it felt like I would never get the pay off of a well fitted item. I told myself that I wouldn’t buy new fabric for an outfit until I got the personal block done. I worked on this for weeks off and on. It was something that required a lot of trial and error. But I did it in the end. Please don’t give up if it is hard, be willing to make adjustments and start fresh and use your mistakes to make things work better next time. It will be worth it.
Also, as a note, you will need an assistant to take body measurements and help fit the toile. Be nice to them if you get stuck with a pin and don’t demand that they jump every time you’re ready to do a fitting or need a measurement. If you’re anything like me, your assistant is your spouse and it’s better to keep them happy.
|
|
|
1.Body Measurements:
The first step is to take complete body measurements. Take the following measurements:
For the bodice block, the arm measurements are one of the most important. You will also use the back length + the waist to X length to determine how long to make a garment and this is very important. For example, if you want a knee length garment, simply add the back length from nape of the neck to waist + the waist to knee measurement to get the total garment length.
If this seems like a lot of measurements, you’re right and you may not need to use them all in constructing the block. However, these measurements will come in handy later on when adjusting the bodice block to a garment pattern such as a kirtle or cotehardie.
The first step is to take complete body measurements. Take the following measurements:
- Neck circumference
- Chest (full breath)
- Waist (narrowest point of your torso)
- Seat or hip measurement (widest point of your buttock)
- Thigh (thickest portion of the thigh
- Shoulder to waist
- Shoulder to hip/seat
- Shoulder to knee
- Shoulder to ankle
- Back length (nape of neck to waist)
- Waist to hip
- Waist to floor
- Waist to knee
- Shoulder joint to wrist
- Tip of shoulder to wrist
- Shoulder joint to elbow (with straight and bent elbow)
- Shoulder joint to wrist (with straight and bent elbow)
- Elbow to wrist
- Bicep circumference
- Forearm circumference
- Wrist circumference
- Hand (the smallest loop the hand can fit through.
For the bodice block, the arm measurements are one of the most important. You will also use the back length + the waist to X length to determine how long to make a garment and this is very important. For example, if you want a knee length garment, simply add the back length from nape of the neck to waist + the waist to knee measurement to get the total garment length.
If this seems like a lot of measurements, you’re right and you may not need to use them all in constructing the block. However, these measurements will come in handy later on when adjusting the bodice block to a garment pattern such as a kirtle or cotehardie.

2. Modeling the toile:
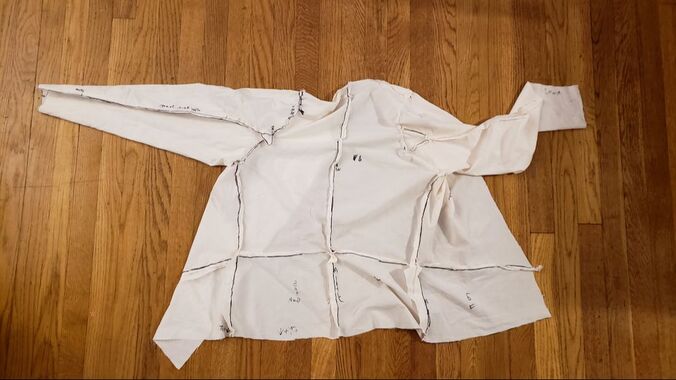
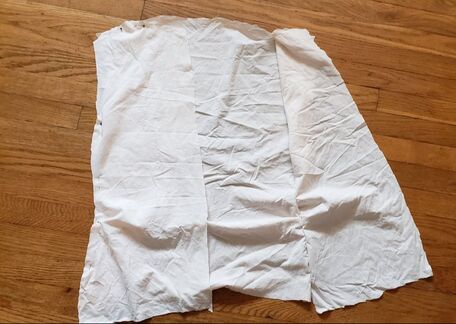
If you have followed the tutorial on this site for making chausses, then you will have some familiarity with the idea of making a toile. You will need thin fabric that you can drape over your body and a volunteer to place the pins in the toile to follow the contours of the body. I have used old bedsheets for my toiles, which works well. Unfortunately, I do not have any pictures of modeling the toile because it is an involved process and a little hard to photograph. You'll have to deal with my terrible drawings instead.
To Start: Picture (1)
Start with two large rectangles of fabric which each are approximately 20 cm longer than your shoulder to hip measurement and 20 cm wider than half of your largest body girth measurement.
You should have two rectangles which cover the front and back of your torso. First, mark the center line of both sheets. Next, drape the sheets over your body and pin the pieces together at your shoulders. Don’t worry about following the shoulder line perfectly yet, just let it hang on your body for now.
Once it is hanging on your body pin at the waist and the hips. It is best to have the pins pointing downward and parallel to your body.
With the sheets secured on your body, have your assistant go back to the shoulders and re-pin the fabric to closely follow the contours of the shoulders. As you do this, you will have extra fabric above the pin line, this is good. You are pinning the fabric to follow your body and everything outside of the pin line will be removed eventually to turn this into a body measurement.
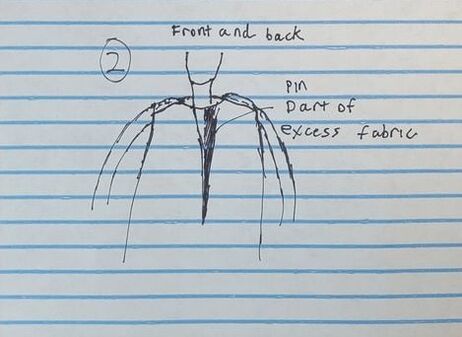
Back: Picture (2)
Now turn your back to your assistant and place some pins following the contour of the shoulder blade. These pins will not be attached to the front but are just to mark the shoulder blade line.
You might need to cut a slight curve of fabric for the neck. These will be preliminary at this point, so less is more.
When you cut the back neck opening down, pinch the excess fabric down the center line and pin that triangle of fabric to itself to narrow up the back. This will be fabric to remove from the toile later.
Front: Picture (2)
Cut a curved preliminary neck hole. The front portion of the neck is always deeper than the back to ensure proper fit. Next find the dart in the center front as you did for the back. Use the pins to hold the pinched fabric together and narrow the front of the torso. Start to pin the front and back together along the bottom of the armhole. As you start to form the arm opening, trim some of the excess from the arms to make it easier to work with the toile.

Waist: Picture (3)
At the waist, you will gather the excess fabric along the horizontal on the front and back. Depending on your proportions, this may be just below the ribs where you need to reduce the toile’s width. The excess fabric, like with the vertical darts, will be pinned to itself to reduce the excess. Again, depending on your proportions, the waist dart may be perfectly horizontal or it may follow the contours of the stomach and curve downward toward the center.
At the waist, you will gather the excess fabric along the horizontal on the front and back. Depending on your proportions, this may be just below the ribs where you need to reduce the toile’s width. The excess fabric, like with the vertical darts, will be pinned to itself to reduce the excess. Again, depending on your proportions, the waist dart may be perfectly horizontal or it may follow the contours of the stomach and curve downward toward the center.
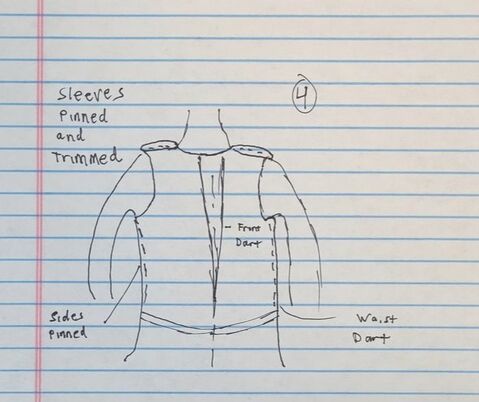
Arms: Picture (4)
With your arms raised, pin the front and back together right into the armpits, and trim excess material as your fit becomes more precise. Raise and lower your arms as you do this to check the quality of the fit and adjust the pins as necessary.
The pins you placed on the back and front around the shoulder and arm contours will assist you as you trim down the armholes. You will transition from a boxy rectangle of fabric on your body to a trimmer look with true armholes as you do this process.
Finishing:
Have your assistant draw the outline of the center front dart and take out the pins in that dart. Then cut the toile up the center front line and remove it from your body like a jacket, being careful not to let pins fall out.
Extra considerations for Women:
I can’t give great advice for women on tailoring around the bust as I have only done a toile on myself. However, in general, you should follow the same advice and process. The biggest difference will be that instead of the waist horizontal darts, the toile will form excess fabric under the bust. To address this, work from the armpits and pin the fabric at the sides and trim the arms down. As you do this, you will need to smooth the fabric over and around the bust both up toward the shoulder and in toward the pre-existing central dart. As you do this, re-pin the central dart and the shoulders until there is a smooth effect.
|
|
|
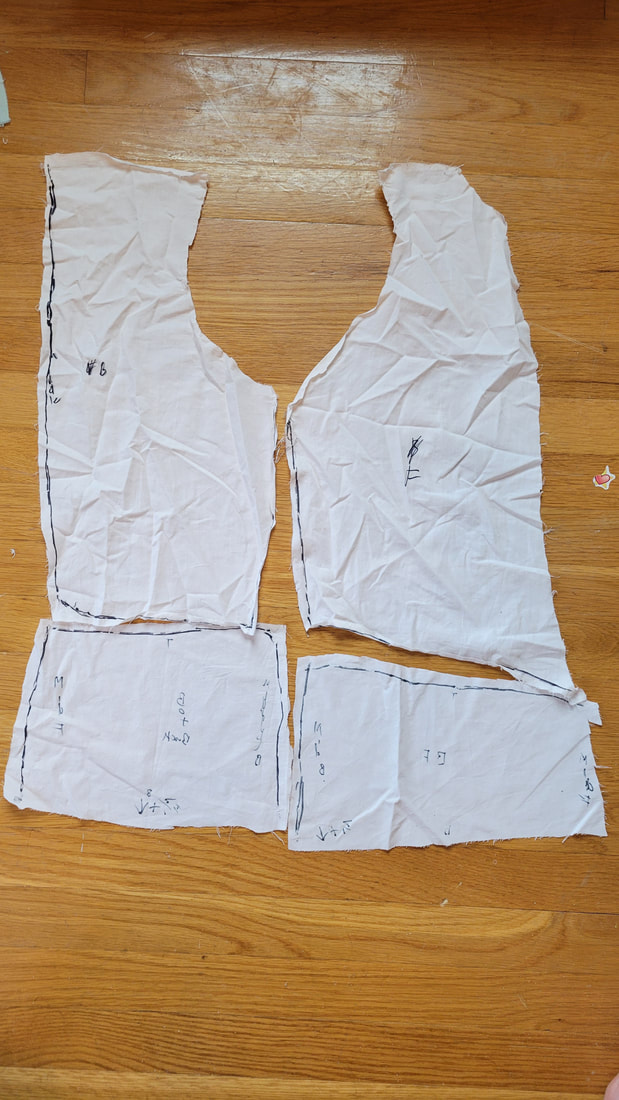
 This is the bodice toile which is basted together and cut out based on the above steps.
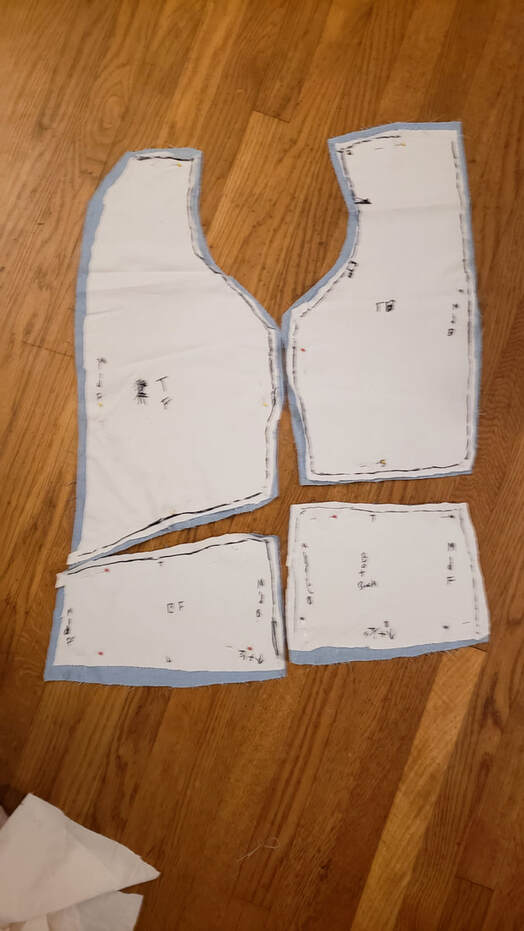
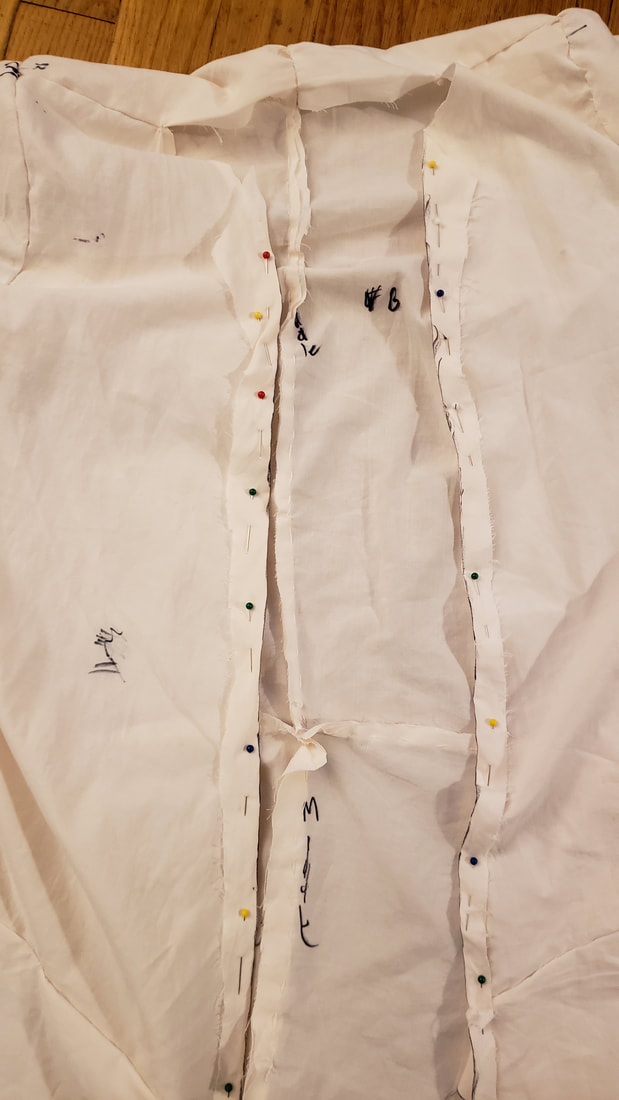
You will now have fabric with lots of pins in it. Use a marker to make lines from pin to pin. You are essentially playing dot to dot with the pins and trying to follow the contours of you body that the pins followed. Those pins will not all be perfectly placed, and you may notice how wonky the line is. Try to normalize the line and make it smoothly transition from one point to the next.
You will have a left front, right front, and back piece. Mark them as such. Take out the pins and use the markings you made. You now have an intermediate pattern.
Cut into the fabric where you made and marked the darts. You will now have top and bottom pieces. Remove the darted fabric and pin or sew the intermediate pattern back together. You may need to make some additional adjustments at this stage by taking the garment in at certain places or refining the cut of the toile. Your goal is to have a smooth effect close fitting to the body. The arm hole should be high in the armpit and the shoulder point at the top of the arm should be placed at or near the divot in the collar bone at the top of the shoulder.
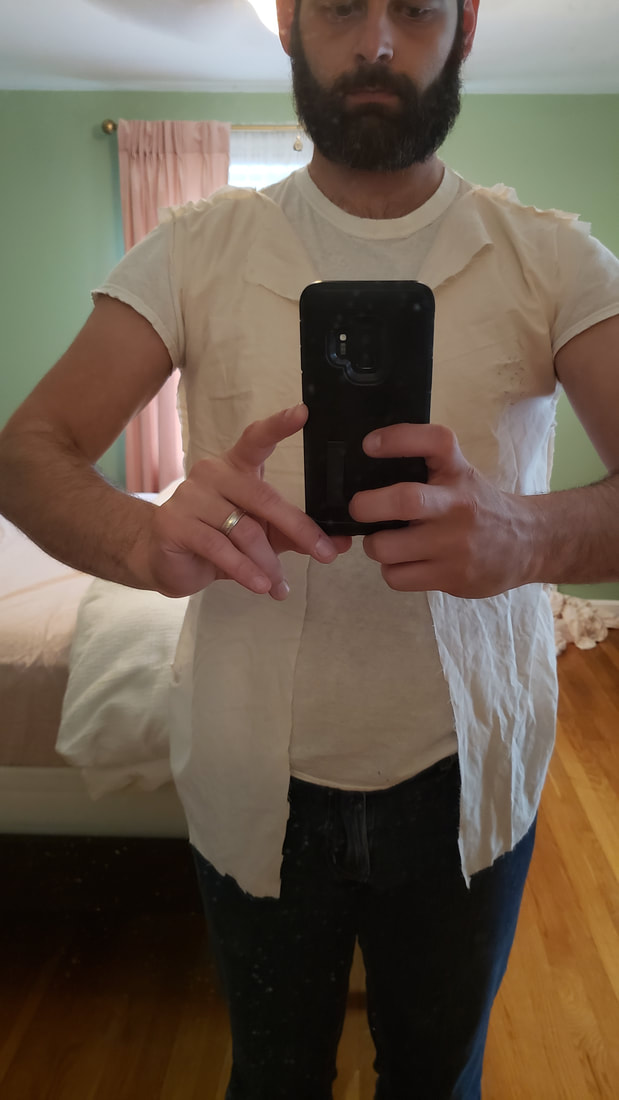
Do a quick basting running stitch to attach the pieces and try it on. It will fit like vest, and if you made it appropriately, you will only just be able to pin it together in the front to close it. Medieval garments should only just meet at the middle with buttons and lacing.
If it fits, you can move on to the next step. If you do not like the fit, then you can try to re-pin/baste stitch where there are problems and adjust the fit. I had to make a second intermediate toile because my first only kind of worked and the adjustments I made required cutting out a new piece altogether. Even after that, my second piece ended up needing some re-tooling and work around the neck and arm holes.
You are looking to make sure the front closure is not too loose, that the arms are snug but have freedom of movement, and that when you raise your arm, the garment doesn’t rise up excessively. The beauty of medieval fitted garments is that they shouldn’t pull or tug as you move. The garment is fitted to you so well that you should have a great range of motion.
Next, trace the outline of the pieces onto pattern paper or brown paper (I used brown craft paper). From there, you can cut out new fabric and use that to fine tune even further or you can use the brown paper as your final pattern if you are happy with the fit. You will have reduced the size of the initial toile by eliminating the darts and following the outlined contours. It should look like the pieces of a suit vest.
You will have a left front, right front, and back piece. Mark them as such. Take out the pins and use the markings you made. You now have an intermediate pattern.
Cut into the fabric where you made and marked the darts. You will now have top and bottom pieces. Remove the darted fabric and pin or sew the intermediate pattern back together. You may need to make some additional adjustments at this stage by taking the garment in at certain places or refining the cut of the toile. Your goal is to have a smooth effect close fitting to the body. The arm hole should be high in the armpit and the shoulder point at the top of the arm should be placed at or near the divot in the collar bone at the top of the shoulder.
Do a quick basting running stitch to attach the pieces and try it on. It will fit like vest, and if you made it appropriately, you will only just be able to pin it together in the front to close it. Medieval garments should only just meet at the middle with buttons and lacing.
If it fits, you can move on to the next step. If you do not like the fit, then you can try to re-pin/baste stitch where there are problems and adjust the fit. I had to make a second intermediate toile because my first only kind of worked and the adjustments I made required cutting out a new piece altogether. Even after that, my second piece ended up needing some re-tooling and work around the neck and arm holes.
You are looking to make sure the front closure is not too loose, that the arms are snug but have freedom of movement, and that when you raise your arm, the garment doesn’t rise up excessively. The beauty of medieval fitted garments is that they shouldn’t pull or tug as you move. The garment is fitted to you so well that you should have a great range of motion.
Next, trace the outline of the pieces onto pattern paper or brown paper (I used brown craft paper). From there, you can cut out new fabric and use that to fine tune even further or you can use the brown paper as your final pattern if you are happy with the fit. You will have reduced the size of the initial toile by eliminating the darts and following the outlined contours. It should look like the pieces of a suit vest.
The bodice toile pieces. Notice the downward angle of the fit because of the waist darts.
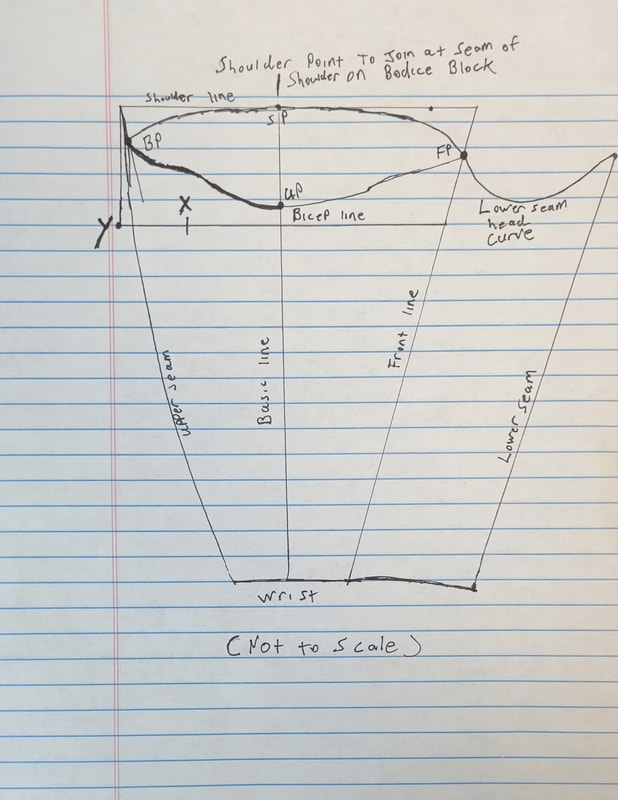 The general shape of the sleeve with notable points and measurements. The lower seam head curve is not to scale in this picture.
3.Measuring the sleeves:
The following portion was derived from The Medieval Tailor’s Assistant by Sarah Thursfield. Her book is very good and worth buying. However, I also found that some portions or her explanation for the making a bodice block and making a fitted sleeve were hard to follow.
Through trial and error, I made mine. Hopefully, my tutorial can help you, but no promises.
Now for the hard part. You have a well fitted bodice block, but you still need to make a well fitted sleeve block. For the sleeve, the seam will be at the back of the arm, and it will be tailored so that you don’t need to set a gusset into it.
The best way to make the sleeve is to draw it directly on brown drafting paper and then use that draft to make a preliminary toile sleeve which you can attach to the bodice toile and adjust from there.
You will need the following measurements from your body and the bodice block pattern you just finished:
On a sheet of drafting paper, draw a basic line the length of your shoulder joint to wrist measurement. Give yourself plenty of space to work with on the paper, because the draft will expand quite drastically from that line on both sides.
The following portion was derived from The Medieval Tailor’s Assistant by Sarah Thursfield. Her book is very good and worth buying. However, I also found that some portions or her explanation for the making a bodice block and making a fitted sleeve were hard to follow.
Through trial and error, I made mine. Hopefully, my tutorial can help you, but no promises.
Now for the hard part. You have a well fitted bodice block, but you still need to make a well fitted sleeve block. For the sleeve, the seam will be at the back of the arm, and it will be tailored so that you don’t need to set a gusset into it.
The best way to make the sleeve is to draw it directly on brown drafting paper and then use that draft to make a preliminary toile sleeve which you can attach to the bodice toile and adjust from there.
You will need the following measurements from your body and the bodice block pattern you just finished:
- measure the arm hole size on your bodice block. Do this a few times, as it is important and difficult to get a good measurement.
- Shoulder joint to wrist measurement
- Bicep measurement
- Wrist measurement
- Sleeve head measurement: Finally, you will need to do some math. Take the bodice block arm hole measurement and round up the total at least .5 cm to the next highest whole number. i.e. any measurement 44.0 to 44.5 cm will be rounded up to 45 cm and 44.6 to 44.9 will be rounded to 46 cm.
On a sheet of drafting paper, draw a basic line the length of your shoulder joint to wrist measurement. Give yourself plenty of space to work with on the paper, because the draft will expand quite drastically from that line on both sides.
Next use half your wrist measurement plus 0.5-1.0 cm for ease. Add to the basic line. Yes, only half of your wrist measurement is centered on the basic line at this time. You will be adding the rest of the sleeve later. This measurement will be a tight wrist which will need to be buttoned with arm buttons.
Mark the top of the basic line with a perpendicular line for the shoulder.
From where the shoulder and the center line meet, measure 1/5 of the sleeve head measurement to the right along the shoulder line. Then use a ruler to join this mark to the right end of the wrist. You have now made the front line of the sleeve.
To the left of the basic line, measure 1/5 of the sleeve head measurement plus 3 cm. If your sleeve head measurement was less than 60 cm, draw a vertical line of 15 cm from that point. If greater than 60cm, draw a 20 cm vertical line. Then draw a line parallel to the shoulder line to the front line. Mark the left most corner of the box you just made as point y
Now, from the front line measure half your bicep size plus 2 cm along the bicep line you made. Mark that spot as x. This distance between y and x will likely be around 3-5 cm.
The next part is perhaps the hardest of all. You are going to find four points (roughly but not necessarily) within the box you made at the top of the arm and then use those points to draft the curve of the sleeve head measurement.
On the top middle is the shoulder point (SP) below that is the under-arm point (UP). On the left is the back point (BP) and on the right is the front point (FP). All of these measurements are subject to adjustment, so use pencil for this part.
Find your x-y measurement. If it is below 5 cm, then mark FP 1/10 the distance from SP. For now, just mark a dot to the right of SP 1/10 the measurement of the sleeve head and mark it FP. If x-y it is above 5 cm, then add 1 cm.
Now mark BP on the left of SP by measuring 1/10 of the sleeve head minus 1 cm. If your x-y is over 5 cm, then don’t subtract from the 1/10 measurement.
Finally, mark UP on the basic line below SP 1/5 of the sleeve head measurement minus 1 cm. If your x-y is greater than 5 cm, then don’t subtract from the 1/5 measurement.
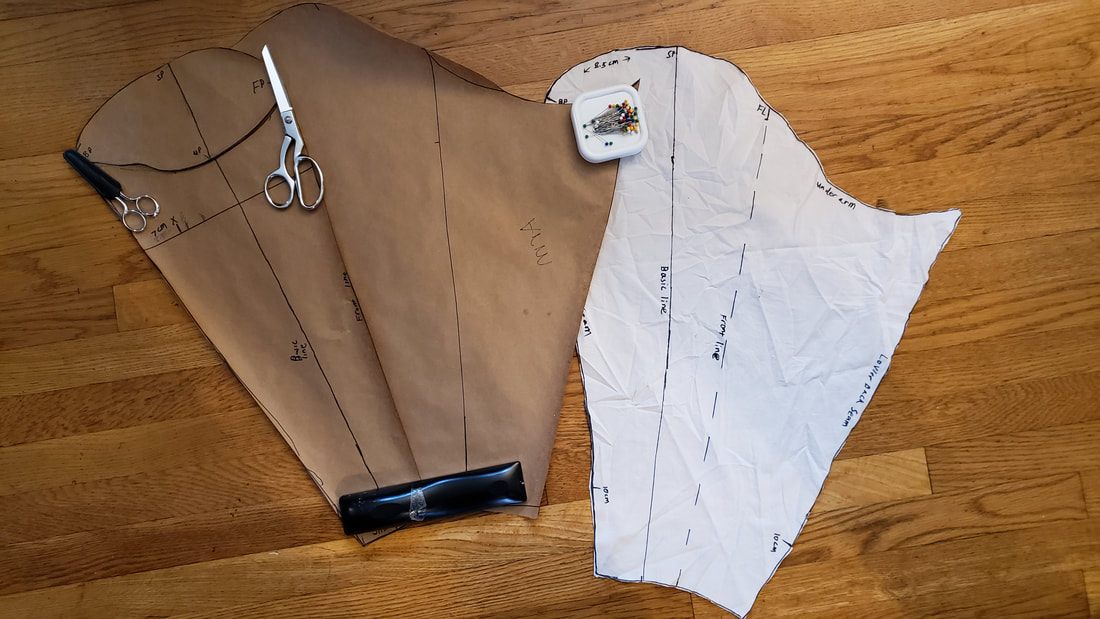
The completed sleeve pattern and the toile piece made of sheeting.
|
|
|
Using a basting stitch, sew up the back seam on the arm and try to fit the sleeve into the bodice toile. Start by joining SP to the bodice shoulder seam and work your way around. If your measurements are off, try to adjust how you sew the sleeve in. If your intermediate sleeve pattern is too big, focus on getting the SP, BP, UP, and FP roughly in the right position so you can see where you have too much fabric and adjust the pattern.
My first pattern was just a little too small to make it all the way around the sleeve opening. If this happens to you, cut a gusset to fit in the opening and sew it in. With the gusset sewn in, check the fit and if it works, take the sleeve off the bodice toile and unstitch the sleeve but leave the gusset attached. Now re-draft the sleeve using the gusset as a “missing puzzle piece” to get the right shape and size.
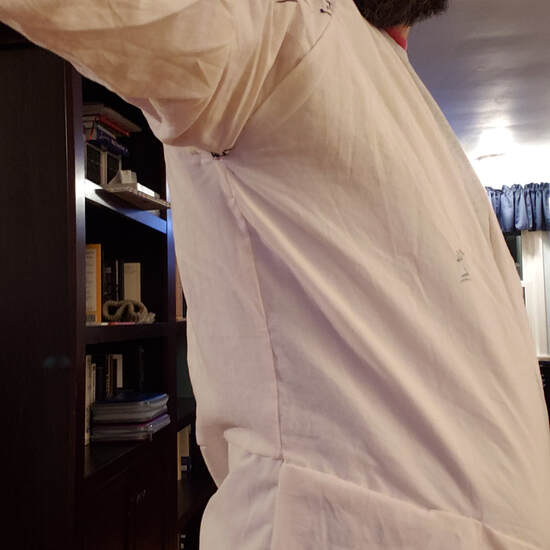
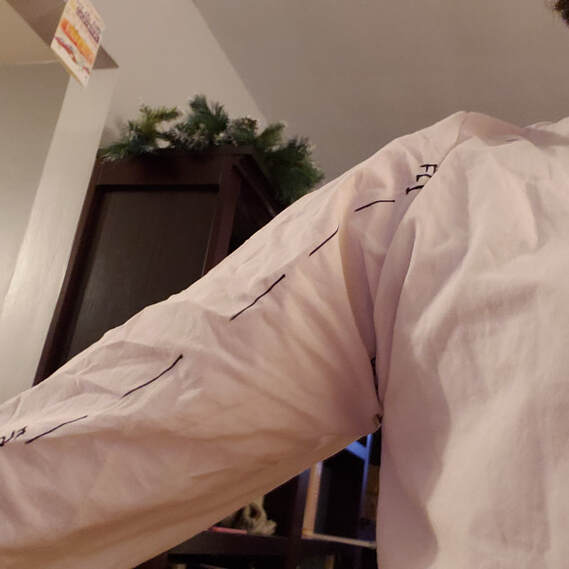
Assuming you get your sleeve set in and well fitted, put it on and pin the front of your bodice toile shut. Try to move around. Lift your arms and engage in normal activity. Sit, stand, jump, watch tv, read a book. Take time to be in the toile with sleeves sewn on and the front pinned shut. If it is uncomfortable, now is the time to find out. Otherwise, you will take that pattern and use it on a doublet which will also be uncomfortable.
If you notice any fit issues such as the armpit still being too high, you can adjust this as necessary. Work to make sure the neck opening is appropriate and that the front closure just meets together while not straining. If you are using a lacing for the front, that will give you a surprising amount a play. Check to see if the back pulls or strains when you move.
My first pattern was just a little too small to make it all the way around the sleeve opening. If this happens to you, cut a gusset to fit in the opening and sew it in. With the gusset sewn in, check the fit and if it works, take the sleeve off the bodice toile and unstitch the sleeve but leave the gusset attached. Now re-draft the sleeve using the gusset as a “missing puzzle piece” to get the right shape and size.
Assuming you get your sleeve set in and well fitted, put it on and pin the front of your bodice toile shut. Try to move around. Lift your arms and engage in normal activity. Sit, stand, jump, watch tv, read a book. Take time to be in the toile with sleeves sewn on and the front pinned shut. If it is uncomfortable, now is the time to find out. Otherwise, you will take that pattern and use it on a doublet which will also be uncomfortable.
If you notice any fit issues such as the armpit still being too high, you can adjust this as necessary. Work to make sure the neck opening is appropriate and that the front closure just meets together while not straining. If you are using a lacing for the front, that will give you a surprising amount a play. Check to see if the back pulls or strains when you move.
Conversely, check to see if anything is too loose. This might be harder to notice, especially because we are used to wearing more loose fitting and/or stretchy materials than in the medieval period. If portions are too loose or gappy, it will make for an ill fitting and poor looking piece later on. See if there are any additional points to take in along the waist, back, or the hips for example.
Another way to check if you have a good fit is to check your pattern against your measurements. You should be within 4-8 cm of your body measurements for a close fitting pattern.
With a good fit, you can take the pieces apart and use them to make a permanent pattern on paper or sheeting. Mark each of the pieces so you don’t mix them up. The final pattern should have a bottom front, bottom back, top front, and top back, and arm. If you are a woman and your block did not have horizontal waist darts, you will have a front, back, and sleeve.
If you successfully finished this project, you should be proud of yourself. It is not easy and will take considerable trial and error. You are not merely making a shirt that anyone your general size could pull over their head with this pattern, you are making a personal fitted pattern unique to you and your body type.
Great job and a great start to making more advanced pieces of 14th century medieval garb such as a doublet or kirtle. You can now use the block you made as a pattern on future garments.