How to Make a Fourteenth Century
Houppelande (Gown)
The Garment:
The gown, also known as the houppelande, rose to popularity in the second half of the Fourteenth century and would remain popular well into the Fifteenth century. The style of gown addressed here is based on a late Fourteenth century iteration of the gown.
The basics are that the gown was always an outmost garment worn over doublet and hose. It was often worn as an alternative to a tighter fitting cotehardie. Even in the fourteenth century, and even within a particular decade, there was a great deal of variation in styles of a gown. For men, the gown could be full length, calf length, knee length, or for the more daring, could be hip length. The shortest gowns clearly display joined hose. The hem on men’s gowns was often dagged regardless of length.
Artwork shows the use of belts. For longer gowns, the belt was often worn at the natural waist and often used to gather the folds of fabric to create a pleated effect. For shorter gowns, the belt is often worn at hip level. However, the gown was not always worn with a belt.
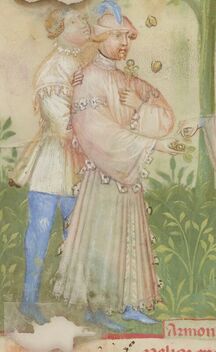
Taciunum Sanitatis of Paris, National Library of France. Department of Manuscripts. NAL 1673, page 7v.
|
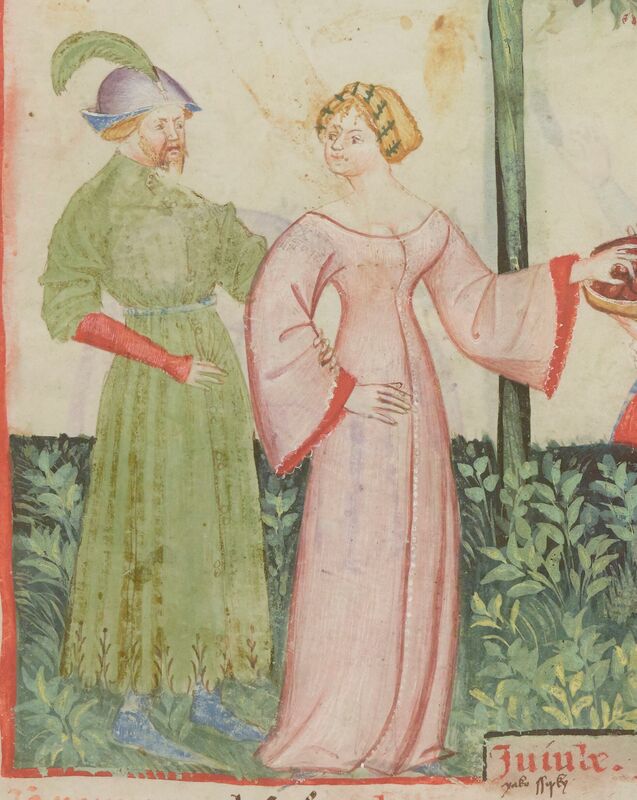
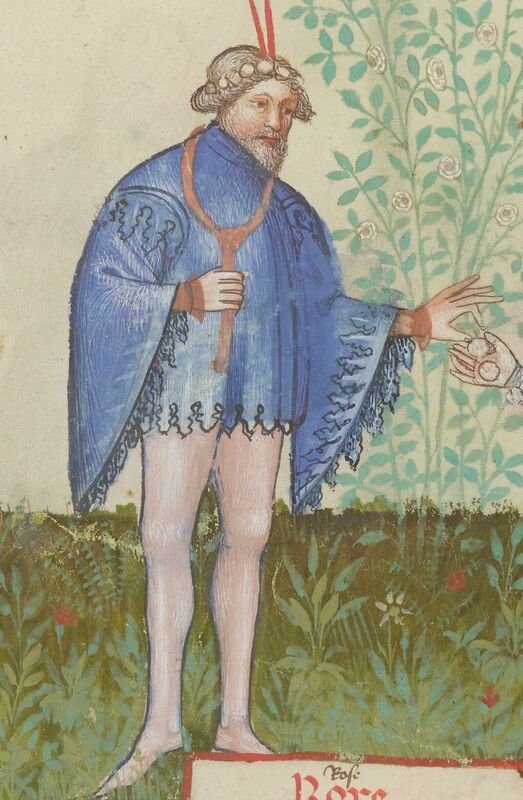
Taciunum Sanitatis of Paris, National Library of France. Department of Manuscripts. NAL 1673, page 13r.
|
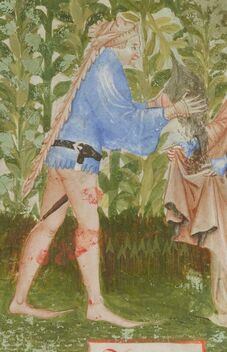
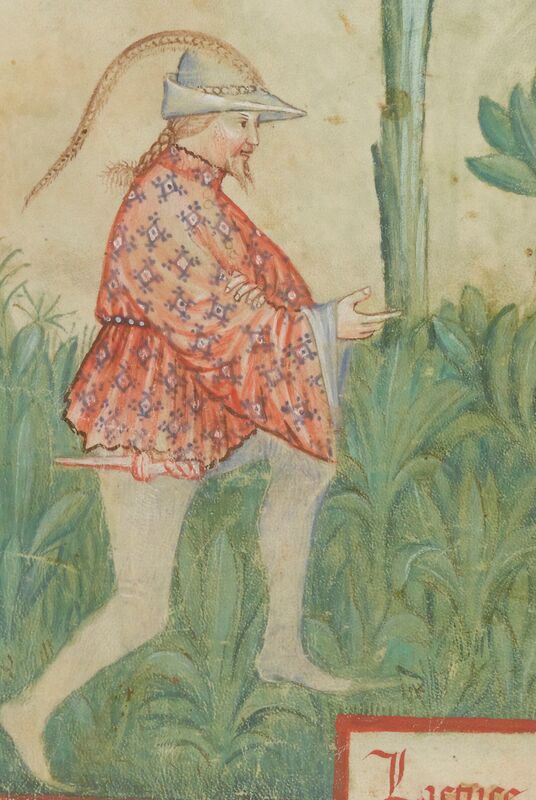
Taciunum Sanitatis of Paris, National Library of France. Department of Manuscripts. NAL 1673, page 23r.
|
Other variations included a buttoned front opening, laced front opening, or a wider pullover version. However, with higher and closer fitting collars, there would tend to at least be buttons at the collar or chest to allow the gown to pull over.
Perhaps the most interesting variation in gown styles was in the sleeves. Some artwork shows large, bagged sleeves with extravagant swoops at the elbow which then come to a close finish around the wrist, often buttons with one, two, or three buttons, but sometimes more. Another sleeve variation included an open sleeve that would hang down from the elbow or forearm. These open sleeves were often lined, sometimes with fur, or could be dagged, or otherwise decorated. You may also see relaxed sleeves with a less pronounced swoop, but still with a definite bagginess or ease. Sometimes you see tighter sleeves with buttons at the wrist and occasionally a tight sleeve through the entire forearm.
Perhaps the most interesting variation in gown styles was in the sleeves. Some artwork shows large, bagged sleeves with extravagant swoops at the elbow which then come to a close finish around the wrist, often buttons with one, two, or three buttons, but sometimes more. Another sleeve variation included an open sleeve that would hang down from the elbow or forearm. These open sleeves were often lined, sometimes with fur, or could be dagged, or otherwise decorated. You may also see relaxed sleeves with a less pronounced swoop, but still with a definite bagginess or ease. Sometimes you see tighter sleeves with buttons at the wrist and occasionally a tight sleeve through the entire forearm.
Taciunum Sanitatis of Paris, National Library of France. Department of Manuscripts. NAL 1673, page 28r.
|

Taciunum Sanitatis of Paris, National Library of France. Department of Manuscripts. NAL 1673, page 94r.
|
Taciunum Sanitatis of Paris, National Library of France. Department of Manuscripts. NAL 1673, page 83r.
|
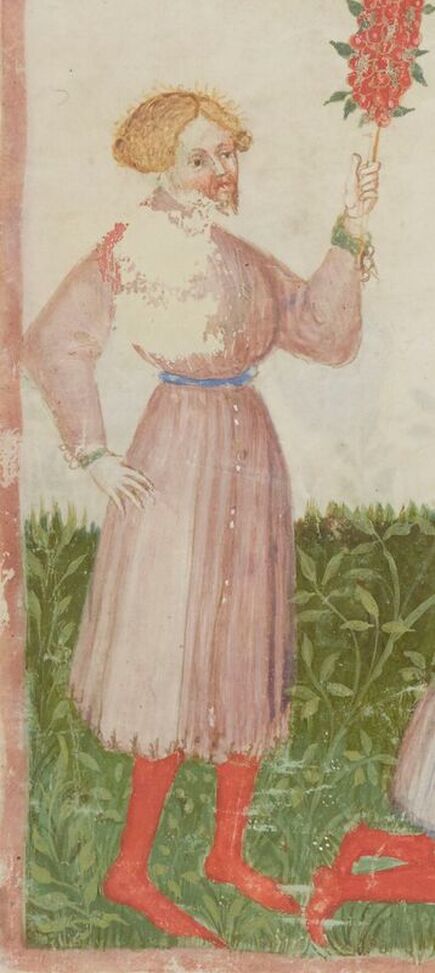 Taciunum Sanitatis of Paris, National Library of France. Department of Manuscripts. NAL 1673, page 9r.
As you can see with a few examples of gowns from the same manuscript, there are tons of variations and the best thing to do is to determine what variations and elements you want for your gown based on artwork from the period you are depicting.
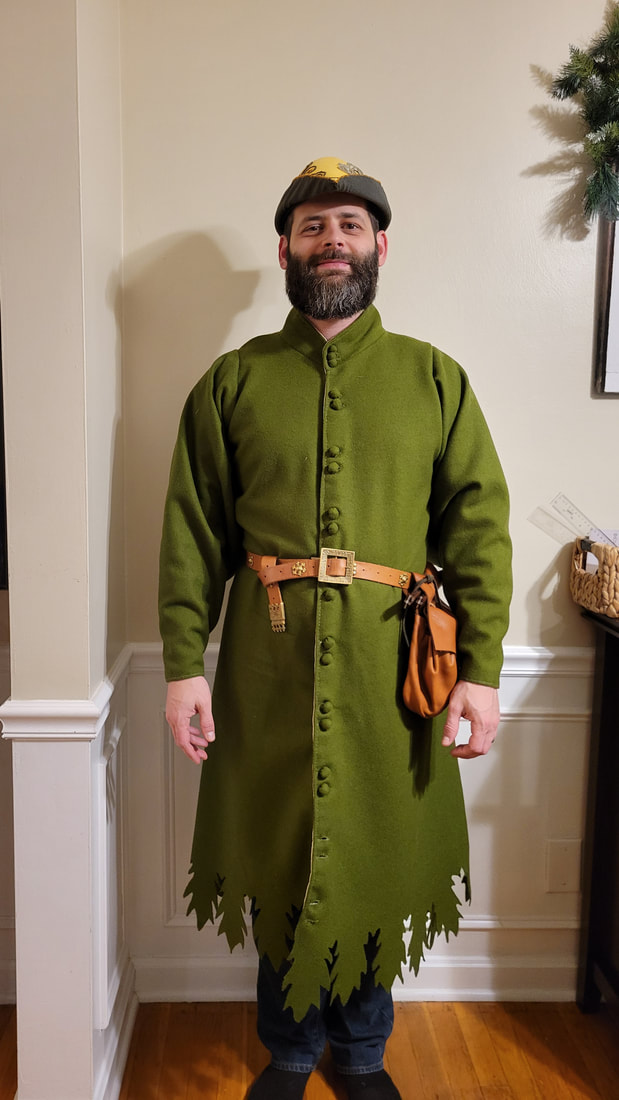
My gown is based on pages 13r and 9r from the Tacuinum Sanitatis of Paris with the color, length, collar, dagging, and sleeves being directly derived from those two illustrations.
Materials:
Use a quality fulled/felted wool that will not fray. For a longer gown, choose a wool that will drape well. For a shorter gown, a lighter wool or a silk will do. If you really want to outdo yourself, find a period appropriate brocaded pattern.
All gowns should be lined, a light worsted wool or linen lining is appropriate. If you want, you can get creative with how you line the gown because most of it will not be visible unless you take it off or unbutton it. This lets you economize with the lining where it really counts, such as the sleeves, the hem, or the collar.
For example, you can use silk to line only the sleeve of an open sleeved gown in order to economize on the fabric and still get the grand effect. You might also try for a similar effect with fur lining around the sleeves or the hem, but make sure you line the rest of the garment with a similar weight/color flannel or similar fabric to help it drape appropriately.
The other thing to consider about lining is that you can piece the fabric together in a way you might not want to on the outer fabric. For example, I used about 2.7 meters of the outer fabric on my gown but only 2 yards of the lining fabric because I didn’t mind piecing the lining in the sleeves and at the bottom of the hem. Therefore, you might be able to maximize an expensive fabric to give the grand effect you want.
First Thing:
Before making this garment, make sure that you have made a doublet to help inform the fit, especially in the sleeves where the doublet buttons may need a bit of accommodation and you don’t want the sleeve of the gown to be jammed up by the doublet.
The Pattern:
The good news is that if you have made a personal block based on the Making a Medieval Garment Pattern page, then you have finished the first step in making a gown pattern. However, there will be considerable additions to the personal block to make this piece.
I highly recommend making a full mock up of the gown with something like an old bedsheet or cheap lightweight fabric. This will help in fitting the collar, the sleeves, and determining the size of the skirt you want.
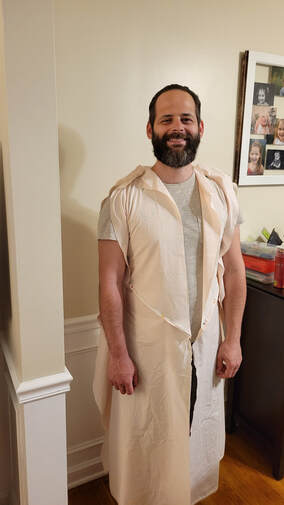
Here is the full body of the sheeting fabric mockup with pins to start working out the fit.
|
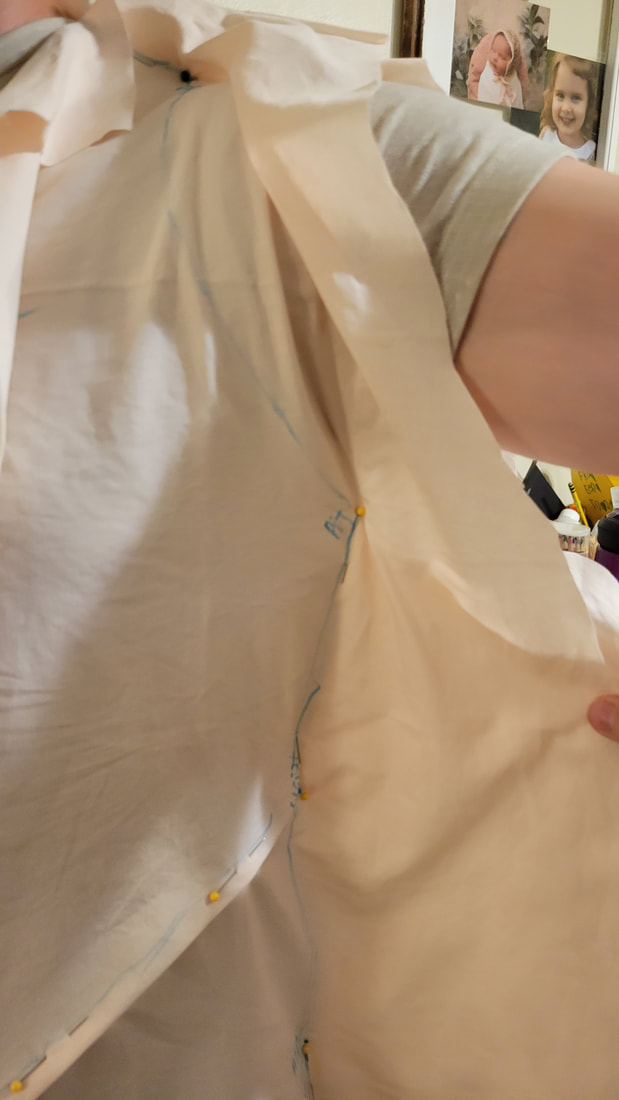
A closeup shows markings on the fabric that will be used as guides for sewing the mockup together. My wife marked areas like the armpit, the waist, and hips, to help.
|
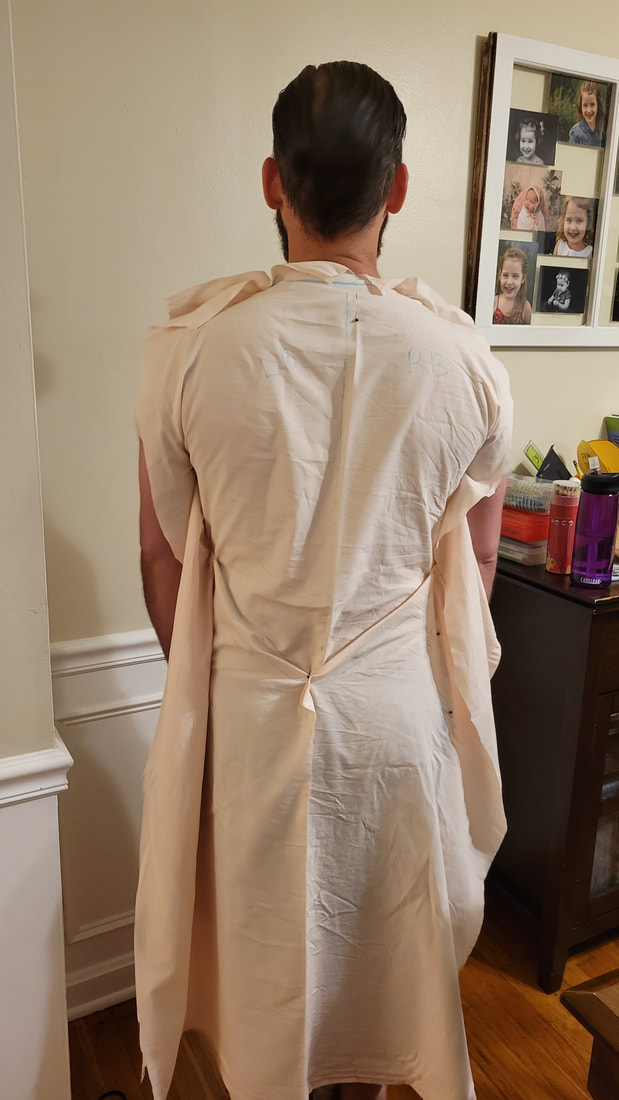
A rear view. As you can see, there is excess fabric that still needs to be cut away or pinned and tailored through darts. The darts on the mockup form the shape of the final pattern so there won't be darts in the final piece.
|
The body:
Start with the personal block bodice and enlarge it to fit over the doublet by giving some extra ease. The bodice block is only needed for measurements to the waist. From the waist down, you will be adding skirt length and width and the bodice block is not necessary.
Take a shoulder to hem measurement. I did a calf length gown, with a bottom hem width of about 300 cm (I can’t really remember exactly now). Obviously, a shorter gown will have a smaller hem measurement and a full-length gown might need to be a bit bigger, but this is also influenced by the shoulder to hem measurement, so you will need to play with this.
The bottom hem measurement is then divided over each of the panels. I did something a little different and went for a single back panel and two front panels. To do the single back panel, I used a bedsheet and had my wife basically do a fresh bodice block for the whole gown, this allowed a pretty close fit along the back, and I opted to only use one panel.
In any event, you will need to divide the total hem length along the panels and draw out on the fabric how wide they will be, you can then “triangulate” from the bottom edges of the hem on each panel to the waist level of the gown that you derived from the bodice block.
The sleeve on the nearly finished mockup.
|
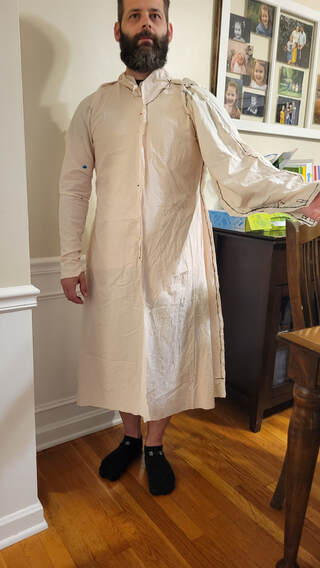
Still some work to be done on the collar, but this is essentially the finished mockup.
|
The Sleeves:
For the sleeves, determine whether you will do an open sleeve, a bag sleeve or something else entirely.
For a close sleeve, you can follow the sleeve pattern derived from the bodice block and add ease to it to achieve the look you desire.
With a bag sleeve or an open sleeve, the best approach is to cut the sleeve with the fabric folded over so there will only be a bottom seam on the sleeve.
The mockup process for these sleeves is easier than the block sleeve, but still takes a little doing. I have derived these instructions from the Medieval Tailor’s Assistant by Sarah Thursfield and cannot recommend that book enough.
Anyway, start the draft by drawing your arm length down a straight line on the paper. This will obviously be the total length of the sleeve. Next, measure 10-12 cm from the arm length into the sleeve line and mark it. This will be the armhole side of the sleeve. Next take half your bicep measurement plus 5 cm from the 10-12 cm point and measure down, mark this point “u.” this measurement is a fail-safe measurement to help guide your sleeve curve.
Next measure the gown’s armhole. Sketch a sleeve shape equal to half the gown’s armhole measurement. You are trying to draw a curve that equals that half-sleeve measurement that flows gently from the arm line, below the “u” point, and falls at the under arm point “UP.” Make sure the UP is not more than 5 cm below the “u” point. If it is, try to redraw the curve to bring the UP up closer to the “u” point.
For the open sleeve, your shape will look something like this:
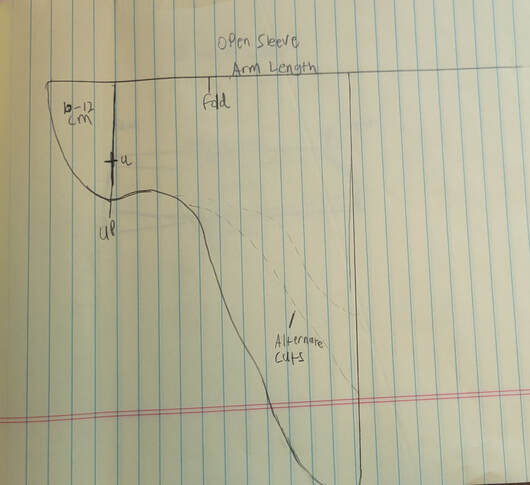
This can be more or less drastic as you see fit, can be dagged or lined. The hash marks in the drawing show possible alternative lengths and shapes. The open sleeve can come all the way to the wrist in some cases or it can be short sleeved and only come to the elbow/forearm. The longer open sleeves tend to be more tubular throughout and then open up at the wrist.
For the bag sleeve like I did, your shape will look something like this:
Again, the hash marks show possible variations on shape and size of the bag sleeve. The thick line demonstrated here is roughly what I used for my final sleeve. However, you can choose for a more subtle or more drastic bag sleeve based on your preferences.
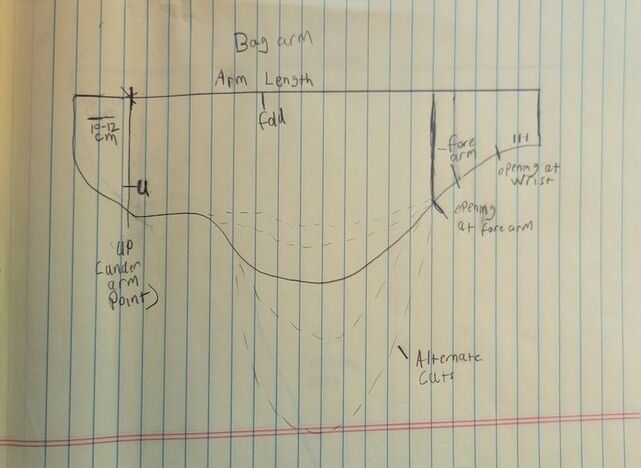
Another option is the forearm. I chose to have the opening at the forearm with a button closure at the wrist. Another option would be to have the sleeve closed up to the wrist with a button closure at the wrist. I chose to have the open forearm so the sleeve could be pushed up and out of the way if necessary.
I did a mockup on paper in full size to get a sense of the shape I wanted and then cut it out on the sheeting fabric. When I first tried it on, I realized I didn’t like the shape and altered it considerably. I actually made a fresh sleeve from the sheeting fabric and started over based on the results from the first attempt.
On the second attempt, it fit better but still needed some minor tailoring, so I cut a dart into the front of the sleeve at the arm hole to tighten it up a bit and used that finalized result as my pattern.
The collar:
Oh boy, this was my first true collared garment and gave me a bit of a hard time.
To make the collar I cut a slightly deeper neck into the bodice gown template I was working from. I’m talking about 1 cm lower than the existing collar line transferred from the bodice block. I then measured the entire collar length with a tape measure.
The collar was originally going to be a two-piece collar, so I halved the collar length measurement and created two collar pieces. I cut them based on the collar length and with enough height that I could roll/trim it down to the appropriate height I wanted after fitting.
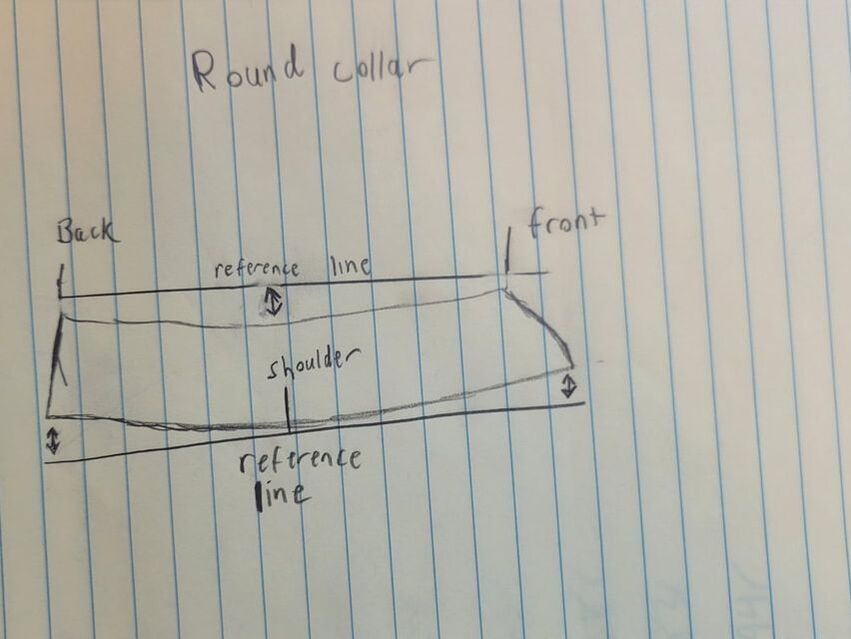
The tricky part is getting the collar pieces to gently curve around the back of the neck, up the shoulder, and then back down the front of the body. The do this, add a slight upward curve at the bottom of the end points of each collar piece and a slight downward curve to the middle of each collar piece
Oh boy, this was my first true collared garment and gave me a bit of a hard time.
To make the collar I cut a slightly deeper neck into the bodice gown template I was working from. I’m talking about 1 cm lower than the existing collar line transferred from the bodice block. I then measured the entire collar length with a tape measure.
The collar was originally going to be a two-piece collar, so I halved the collar length measurement and created two collar pieces. I cut them based on the collar length and with enough height that I could roll/trim it down to the appropriate height I wanted after fitting.
The tricky part is getting the collar pieces to gently curve around the back of the neck, up the shoulder, and then back down the front of the body. The do this, add a slight upward curve at the bottom of the end points of each collar piece and a slight downward curve to the middle of each collar piece
|
|
Put another way, instead of cutting a perfect rectangle, you want a curve on the bottom at the front and back of the collar and a curve at the top of the middle of the collar.
I had to make a few mock ups and spent hours on it before I got this right, but I was happy with it in the end. Ultimately, I ended up with a single piece for the collar rather than two pieces, but the basic principle still applies. If you’re like me and learning as you go, be prepared to work at this part. It’s better to work it out in the mockup stage than to struggle with the actual fabric. Still, you may find the additional weight of the fabric with interlining later on alters things a bit, so be prepared to alter a bit and pin things in place for fit before moving on.
If you have worked through the mockup stage, you are ready to move on to cutting the fabric and making up.
Fabric:
I used a super smooth merino wool from Woolsome in Poland. The wool itself was reasonably priced, although the international shipping was obviously a bit more expensive. I was super happy with this purchase and I would highly recommend them even for international purchases. It took a little longer to get the fabric because of customs, and there were some quirky issues with having to set up the credit card payment, but this is good quality wool and they have dozens of great colors.
I purchased 2.7 meters of this fabric.
For the lining, I used a gabardine wool from Burnley & Trowbridge that was donated to me from someone on Reddit who was not going to use it. I had 2 yards of fabric and as you will see, I had to piece some together, but I made it work.
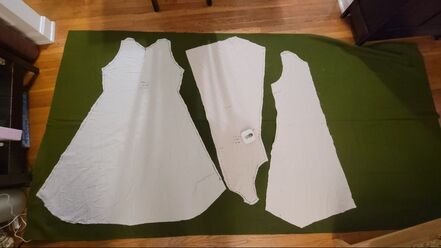
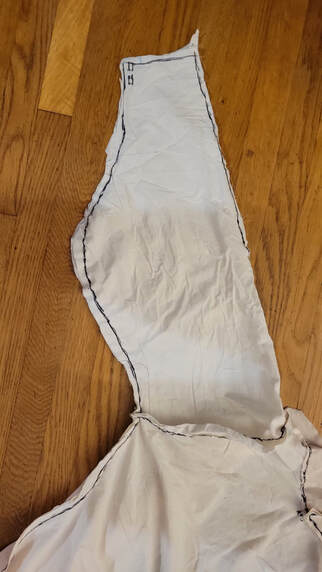
The mockup/pattern laid out on the fabric for cutting.
|

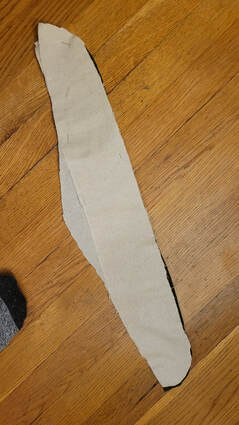
The entire sleeve pattern laid out so the top doesn't have a seam. Note the dart/inward curve on the front of the sleeve.
|
Making up:
Cut out the fabric and the lining. Assembly of the pieces is easy enough. Sew front and back pieces together at the shoulders and then down the sides, leaving the appropriate sleeve head opening based on your prior measurements. Next sew the arms of the sleeves. Do this for the outer fabric and the lining.
For the collar, you will want to add some stiffness/sturdiness. I used thre or four layers of a sturdy linen. You can also use a canvas or other sturdy fabric. I stitched it in place around the edges but left it free on the bottom so it wouldn’t interfere with the seam.
This is an interlining and will provide the necessary structure for the collar. The tricky part is that this means you have a definite right side and wrong side to the collar.
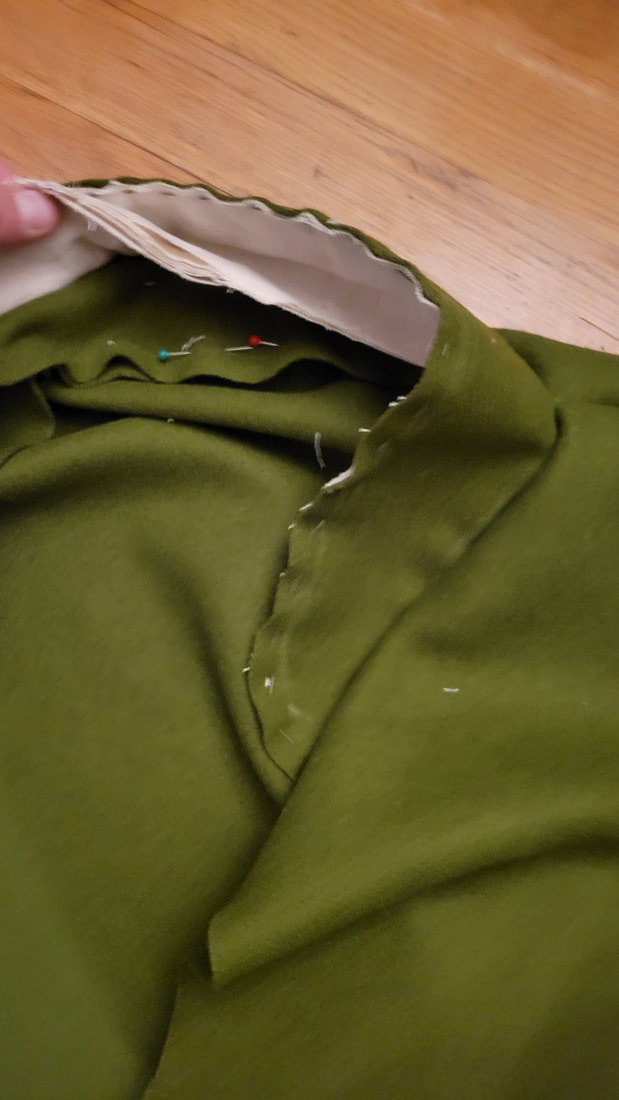
Pin the right side of the collar into the right side of the gown with the collar facing downward. After it is pinned in place, you can turn the collar up, and it should create the seam you are looking for. If it does, sew it in place.
Cut out the fabric and the lining. Assembly of the pieces is easy enough. Sew front and back pieces together at the shoulders and then down the sides, leaving the appropriate sleeve head opening based on your prior measurements. Next sew the arms of the sleeves. Do this for the outer fabric and the lining.
For the collar, you will want to add some stiffness/sturdiness. I used thre or four layers of a sturdy linen. You can also use a canvas or other sturdy fabric. I stitched it in place around the edges but left it free on the bottom so it wouldn’t interfere with the seam.
This is an interlining and will provide the necessary structure for the collar. The tricky part is that this means you have a definite right side and wrong side to the collar.
Pin the right side of the collar into the right side of the gown with the collar facing downward. After it is pinned in place, you can turn the collar up, and it should create the seam you are looking for. If it does, sew it in place.
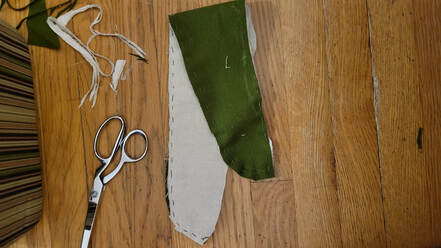
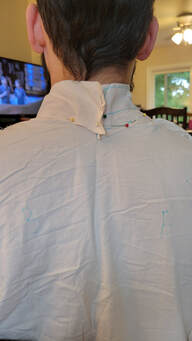
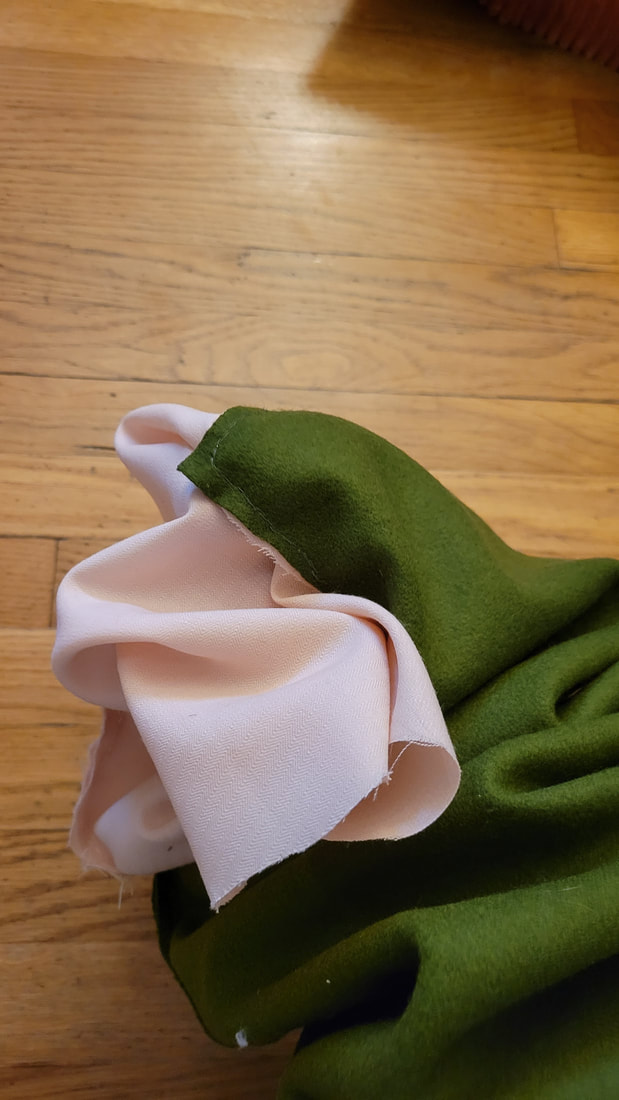
My now one piece collar.
|
|
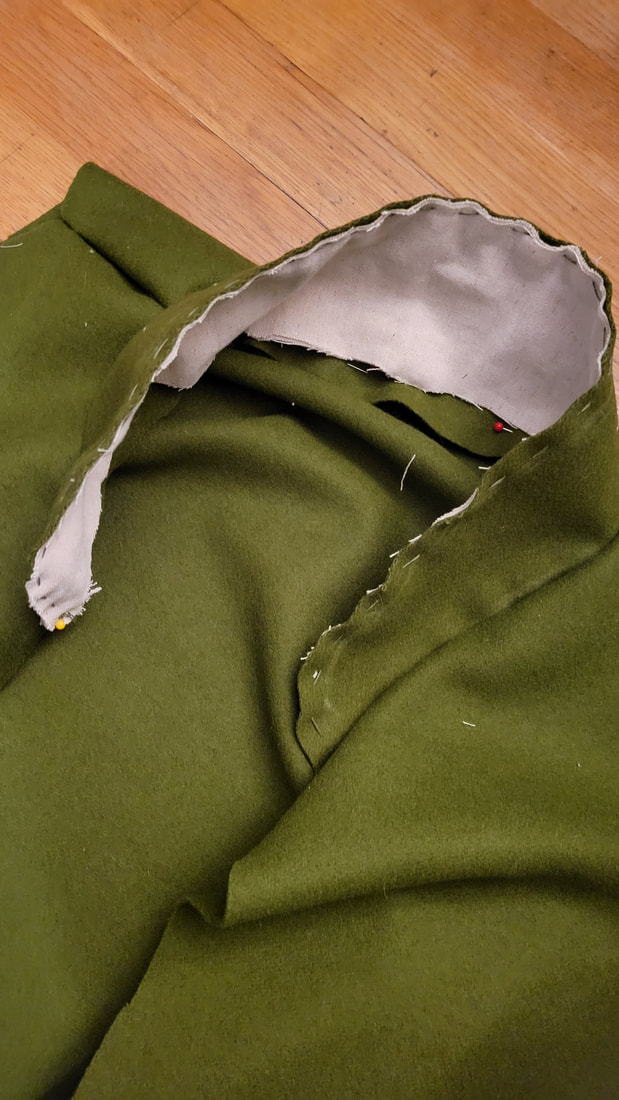
The collar is pinned in right side to the right side of the gown, and will be turned upward. The interlining should be on the wrong side and will later be concealed by the lining.
|
|
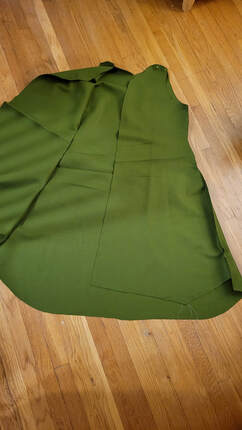
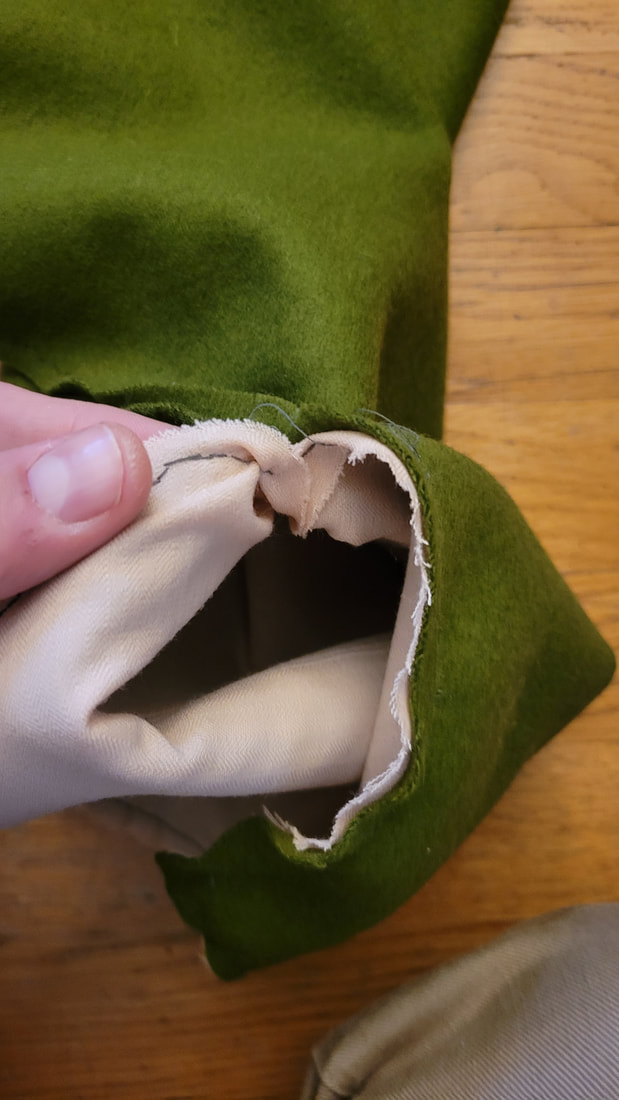
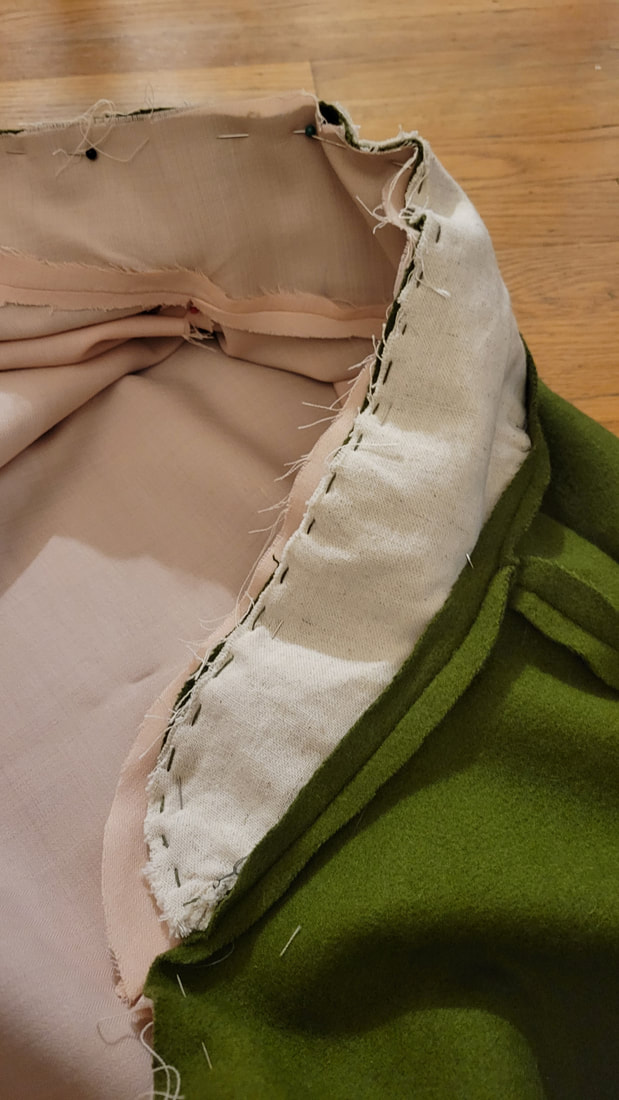
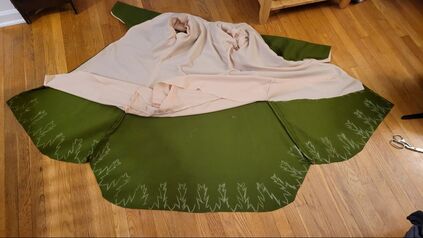
Before lining, iron your seams to get them to lay flat.
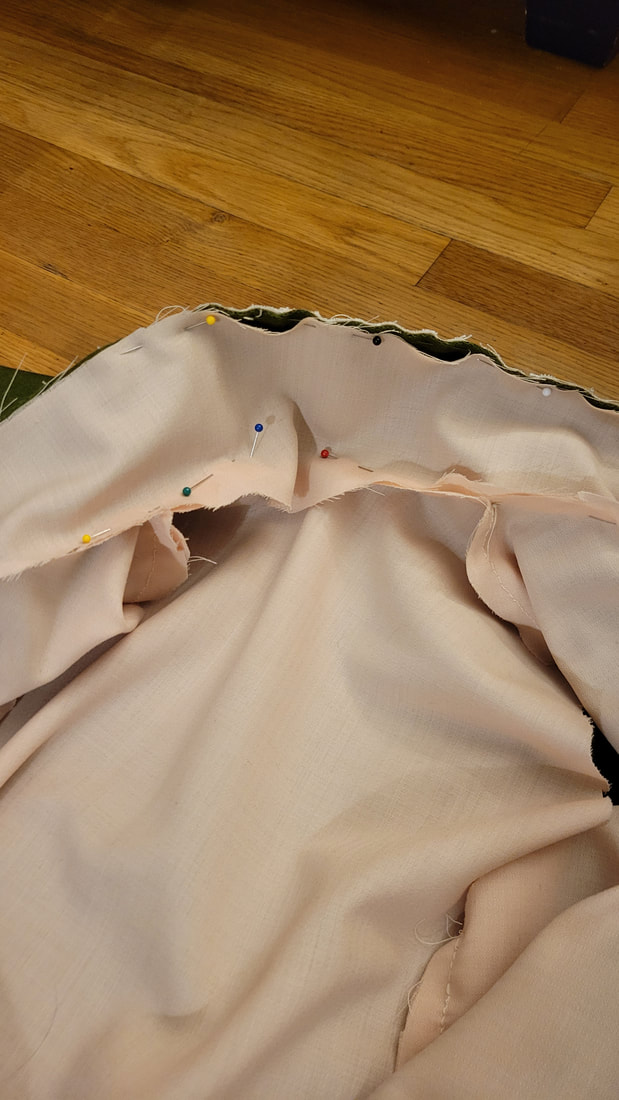
To line the gown, pin the right side of the lining to the right side of the gown around the collar and down each side of the front..
You should see the interlined collar on the outside of the gown. Do not tack anything else. Because the front of the garment is open, it is relatively easy to turn the lining. If you want to add dagging, hold back a little bit from the bottom of the lining in the front. It is easier to finishing sewing the lining in after that and the lining will not be dagged along with the outer fabric. Sew the lining in, trim around any curved seams in the collar to smooth them out and flip the lining and outer fabric so both now face right side out.
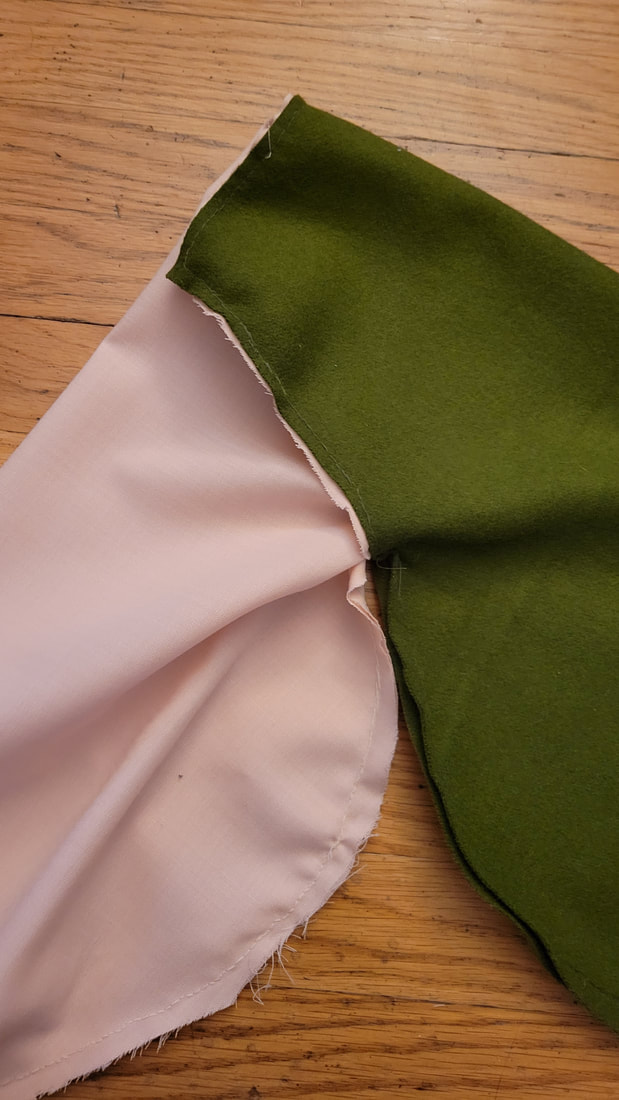
I am still not sure if this is the best way to do the sleeves, but it is the only way I could figure it out. First, sew the outer fabric of the gown and the sleeve together and flip the sleeves. You will have a nice outward seam on the sleeve. Unfortunately, because you have already sewed the lining to the sleeve, there will not be a way to get the lining at the armhole to flip. You will need to sew the gown lining and sleeve lining together and be left with an unfinished armhole. To finish the lining at the armhole, cut a little extra length in the lining sleeve and then use a flat felled seam to enclose the raw edges. However, this seam might be a little uncomfortable in the under arm, so I then tacked that seam down with a hemming stitch so it would lay flat in the armhole.
To line the gown, pin the right side of the lining to the right side of the gown around the collar and down each side of the front..
You should see the interlined collar on the outside of the gown. Do not tack anything else. Because the front of the garment is open, it is relatively easy to turn the lining. If you want to add dagging, hold back a little bit from the bottom of the lining in the front. It is easier to finishing sewing the lining in after that and the lining will not be dagged along with the outer fabric. Sew the lining in, trim around any curved seams in the collar to smooth them out and flip the lining and outer fabric so both now face right side out.
I am still not sure if this is the best way to do the sleeves, but it is the only way I could figure it out. First, sew the outer fabric of the gown and the sleeve together and flip the sleeves. You will have a nice outward seam on the sleeve. Unfortunately, because you have already sewed the lining to the sleeve, there will not be a way to get the lining at the armhole to flip. You will need to sew the gown lining and sleeve lining together and be left with an unfinished armhole. To finish the lining at the armhole, cut a little extra length in the lining sleeve and then use a flat felled seam to enclose the raw edges. However, this seam might be a little uncomfortable in the under arm, so I then tacked that seam down with a hemming stitch so it would lay flat in the armhole.
To line the sleeve, sew the right sides together around the forearm/wrist but do not sew the armholes together.
to line the gown, pin the right sides together around the front and the collar.
|
Just a picture turning the sleeve lining.
|
Turning the sleeve lining.
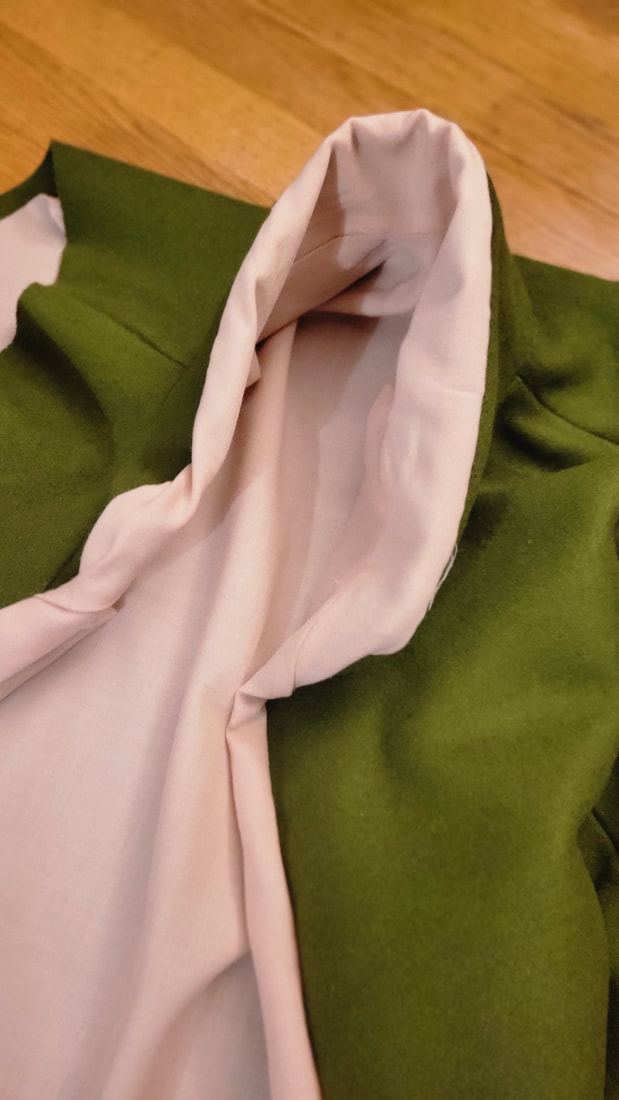
The now turned lining.
|
Now you can iron your seams again to help the lining to lay well. Next, using a back stitch, top stitch around the edge of the collar and down each side of the front of the gown. Do the same around the opening of the sleeve down the arm, the wrist and back up the arm. I used a linen buttonhole 50/3 thread from Burnley & Trowbridge for all visible stitching on the gown, including the top stitching. On the sleeves, I did a small split stitch rather than just a back stitch for the top stitching, maybe it was worth it, but probably not.
Showing the pinned sleeve and the gown, the lining is not sewn together at this time.
|
After it is sewn.
|
Now you can sew the lining pieces together at the underarm and flat fell the unfinished seam.
|
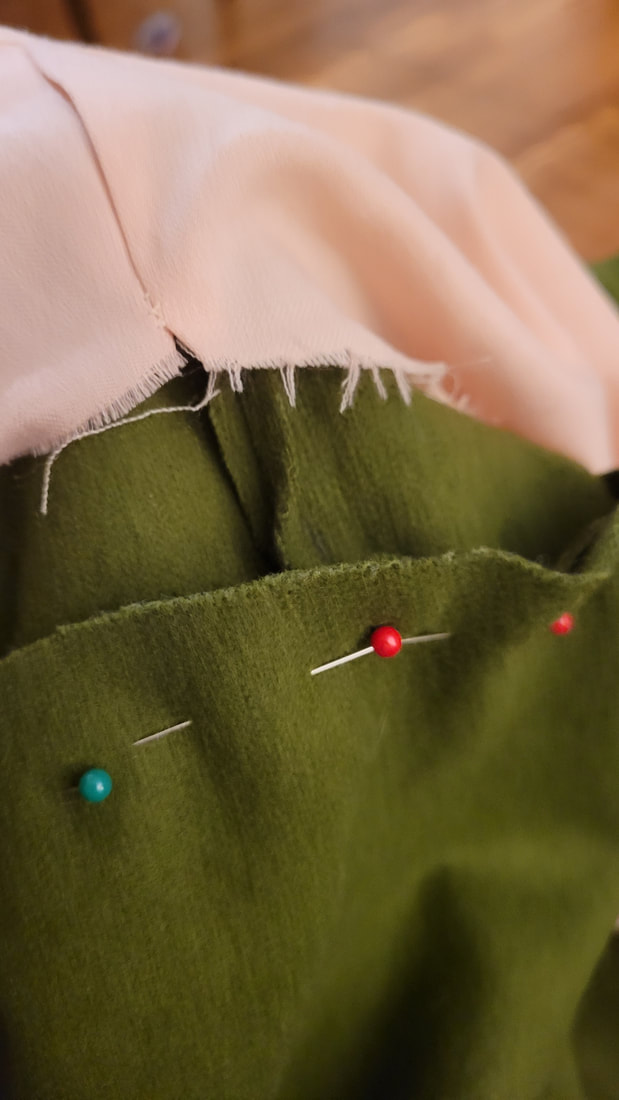
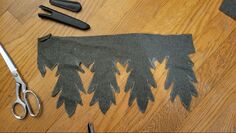
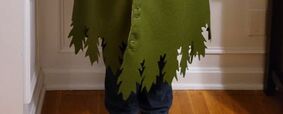
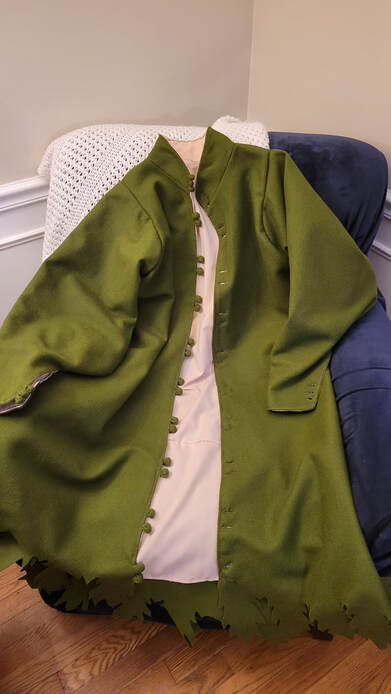
Dagging
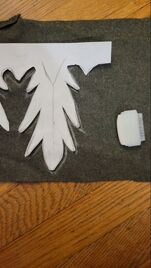
Next we come to dagging the hem. I decided on an oak leaf motif from the Taciunum Sanitatis, but this was a popular motif during the period seen elsewhere. To make it, I sketched a paper template in a few different sizes and determined which I liked best. Then I took that paper template and chalked it onto scrap fabric to get four images in a row. I cut that out and then used the fabric template on the bottom of the gown and marked it with chalk. As I went around the gown, the fabric template let me stretch or scrunch the pattern a little bit as necessary to accommodate the curve of the gown and to avoid odd cuts on seams. After I chalked everything out I carefully cut the pattern out. Keep the scrap fabric as it will come in handy when making button blanks and for stuffing the buttons with scrap.
Next we come to dagging the hem. I decided on an oak leaf motif from the Taciunum Sanitatis, but this was a popular motif during the period seen elsewhere. To make it, I sketched a paper template in a few different sizes and determined which I liked best. Then I took that paper template and chalked it onto scrap fabric to get four images in a row. I cut that out and then used the fabric template on the bottom of the gown and marked it with chalk. As I went around the gown, the fabric template let me stretch or scrunch the pattern a little bit as necessary to accommodate the curve of the gown and to avoid odd cuts on seams. After I chalked everything out I carefully cut the pattern out. Keep the scrap fabric as it will come in handy when making button blanks and for stuffing the buttons with scrap.
|
|

|
|
|
|
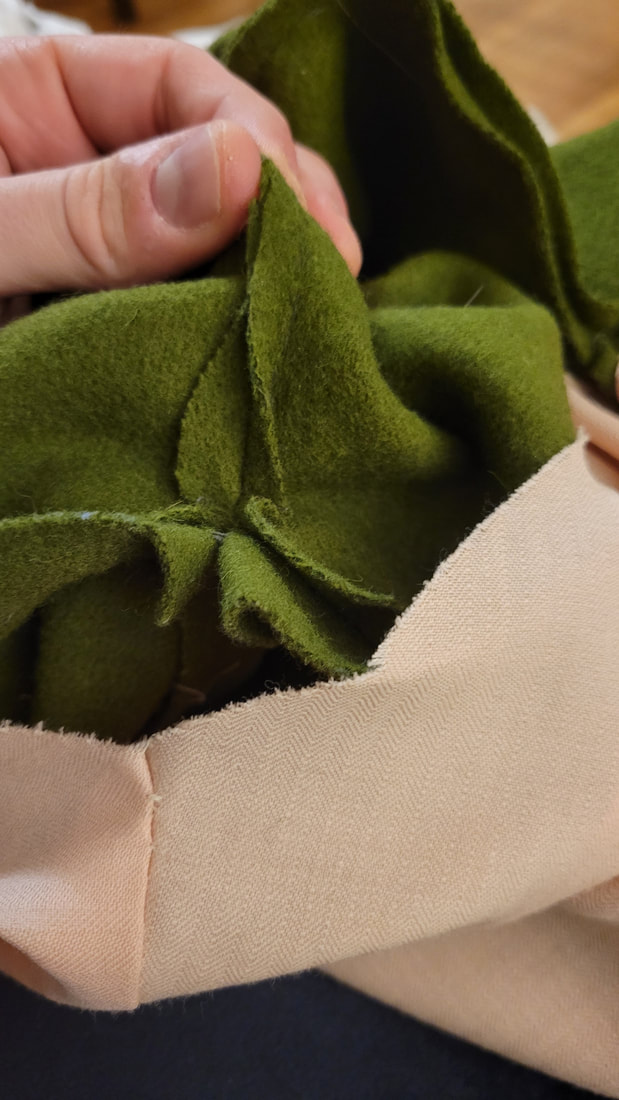
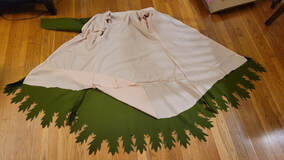
Finishing the lining
With the dagging done, you can finish setting the lining in and hem it in place above the top of the dags. I actually just hemmed the lining and left it loose at the bottom as I may come back to do a band of embroidery. It’s finished at the front, but can be lifted away if I want to. This also allows for alterations to the seams, should they be necessary.
With the dagging done, you can finish setting the lining in and hem it in place above the top of the dags. I actually just hemmed the lining and left it loose at the bottom as I may come back to do a band of embroidery. It’s finished at the front, but can be lifted away if I want to. This also allows for alterations to the seams, should they be necessary.
Making buttons and buttonholes:
Medieval buttonholes were not made like our modern buttonholes. First, they did not outline stitch and then cut a buttonhole and then oversew the buttonhole. Instead, they would use a small chisel, cut the buttonhole, and oversew around the opening. It does not appear that medieval tailors used any reinforcement beyond that.
Buttons were often made from the same fabric as the garment, called self-fabric buttons. These would be stuffed with some scrap fabric to stiffen them up and were sewn directly on the edge of the garment rather than the front as we are used to seeing.
In the past when I have made buttonholes, I was using a lighter weight fabric and lighter weight thread. I was afraid my buttonholes would tear through and fail so I tried to make them sturdier, even if not historically accurate.
With this piece, the wool is much denser than prior purchases and the thread I am using is higher quality, thicker, linen thread. So this time, I made the buttons as historically informed as I knew how. I used the Textiles and Clothing, c.1150-1450 by Elisabeth Crowfoot, Frances Pritchard, and Kay Staniland. This book contains a trove of information on historical textiles and clothing based on excavations from London. It has a section on buttons and buttonholes, which I have based these instructions off of.
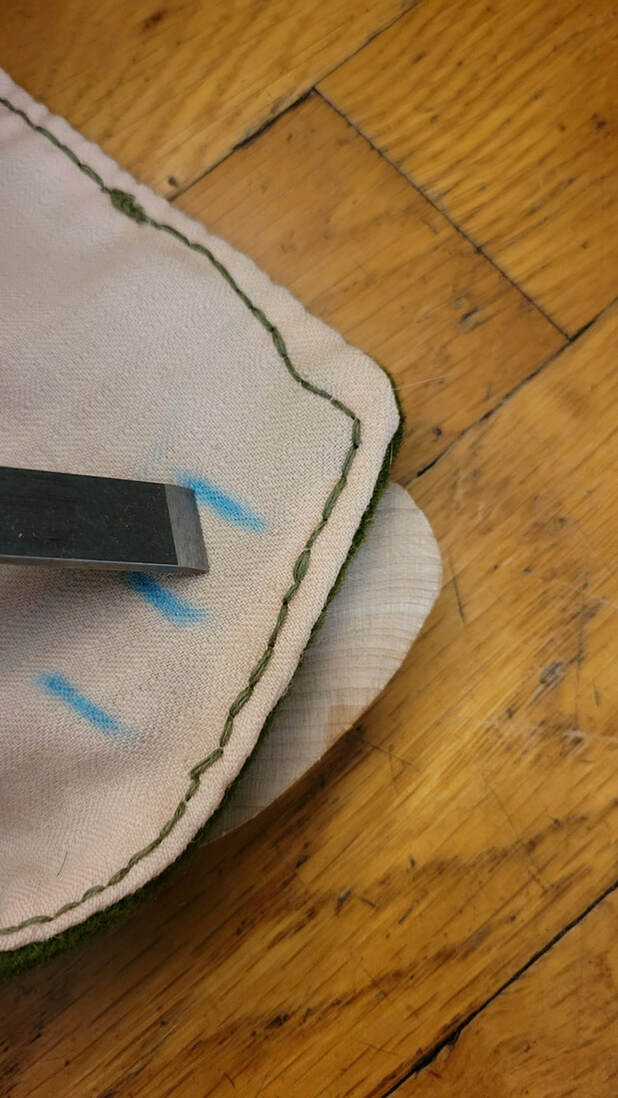
The chisel I bought was designed for hand cutting buttonholes and came with a little apple shaped piece of wood to use as a base. I made some mock up pieces to figure out how big I wanted to make the buttons and how to size the buttonholes accordingly. Then I took that information and marked out the locations for the buttonholes on the sleeves and the gown.
|
|
|
|
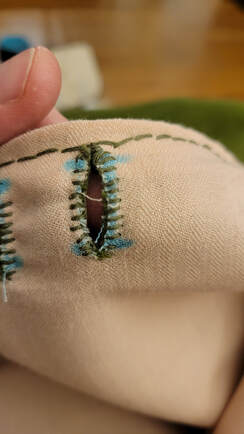
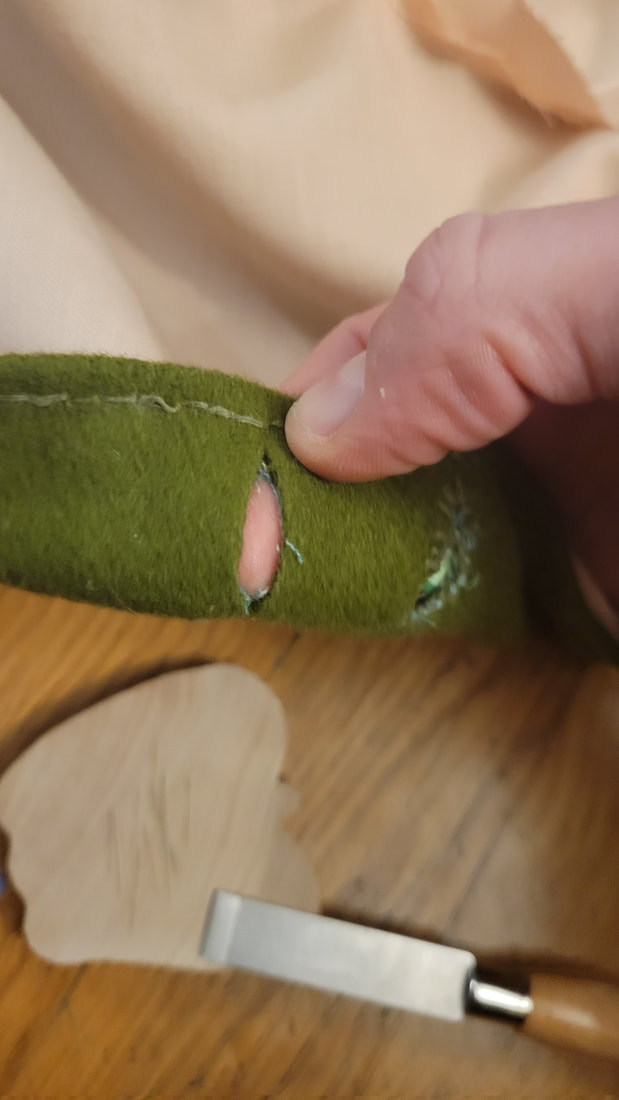
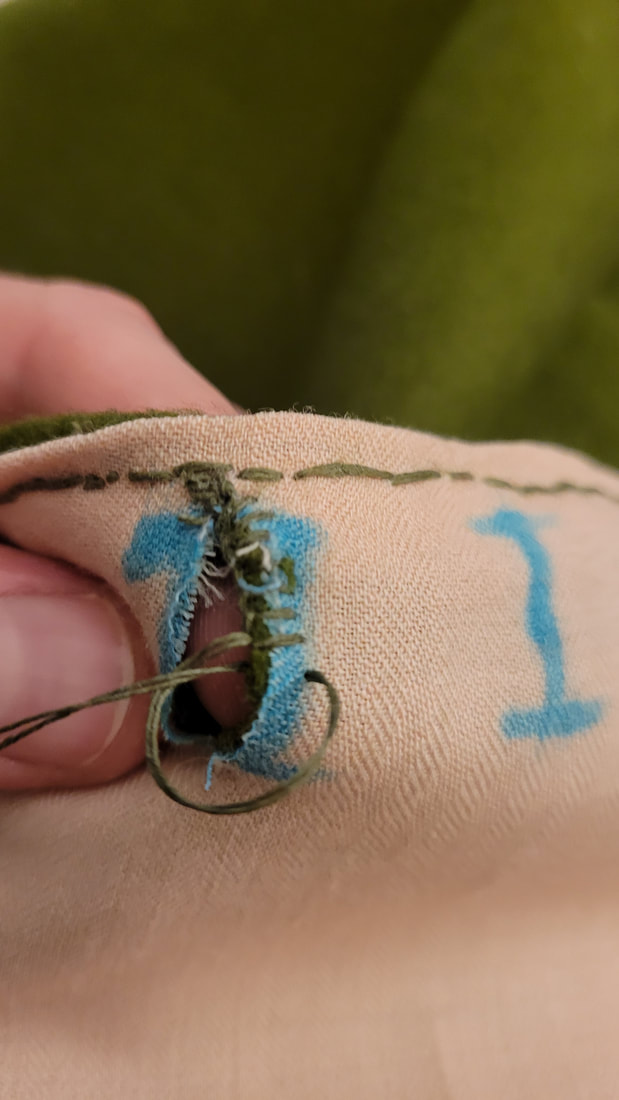
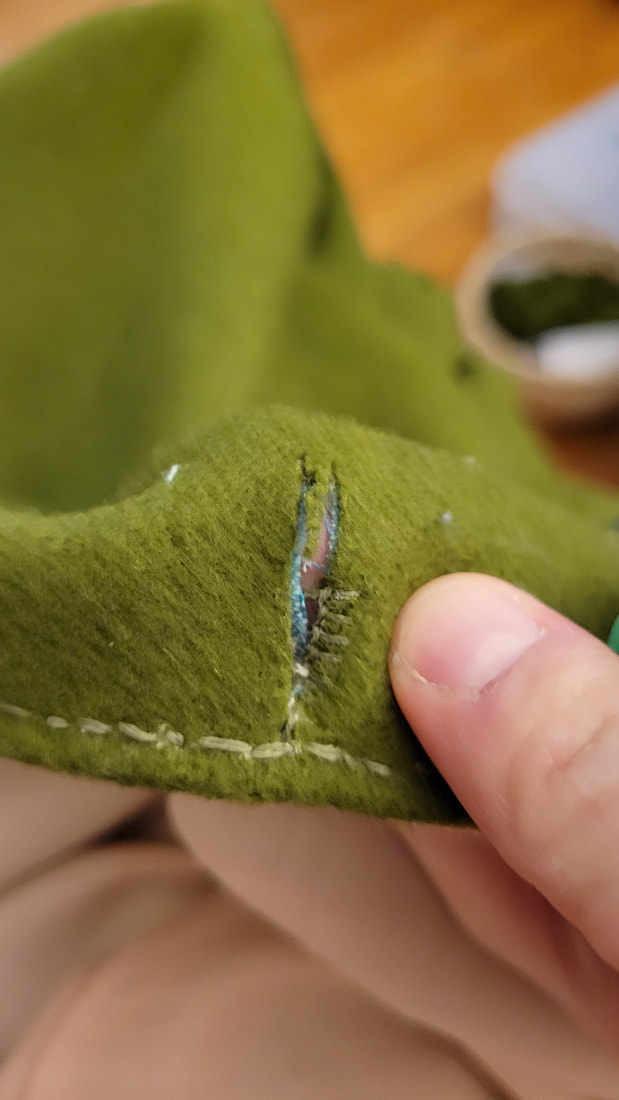
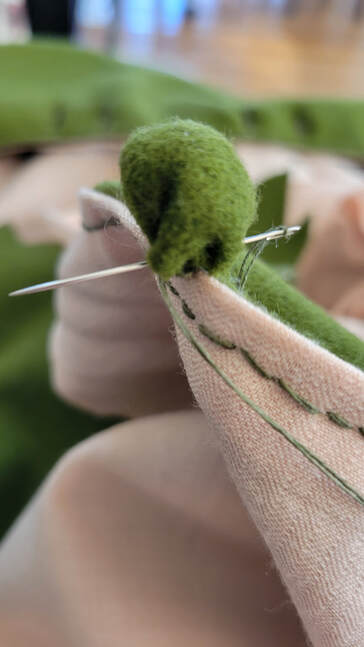
To make the buttonholes, use the chisel to cut the appropriate sized line. The line for the smaller buttons I used was about 1.7 cm long. I then oversewed around the opening, putting the needle through the lining, down through the outer fabric and then bringing the needle up through the buttonhole and looping the thread around the needle, making sure to pull the thread tightly as it encases the buttonhole edge.
Because of the nature of the woven gabardine fabric, there were some loose/frayed threads on the lining fabric, but I was able to trim these down with scissors later for the most part.
I like to have the buttonholes in place before putting the garment on and determining where the place the buttons by using pins to slide through the buttonholes and into the corresponding spot where the button should go.
|
The spacing for the larger buttons.
|
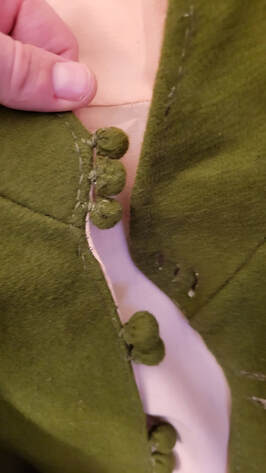
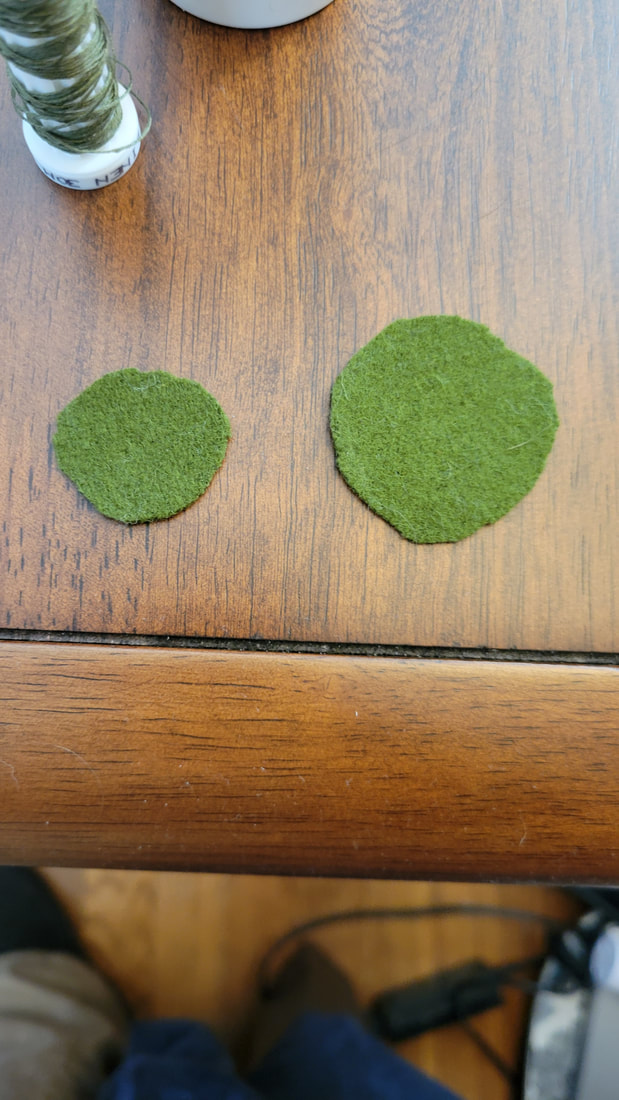
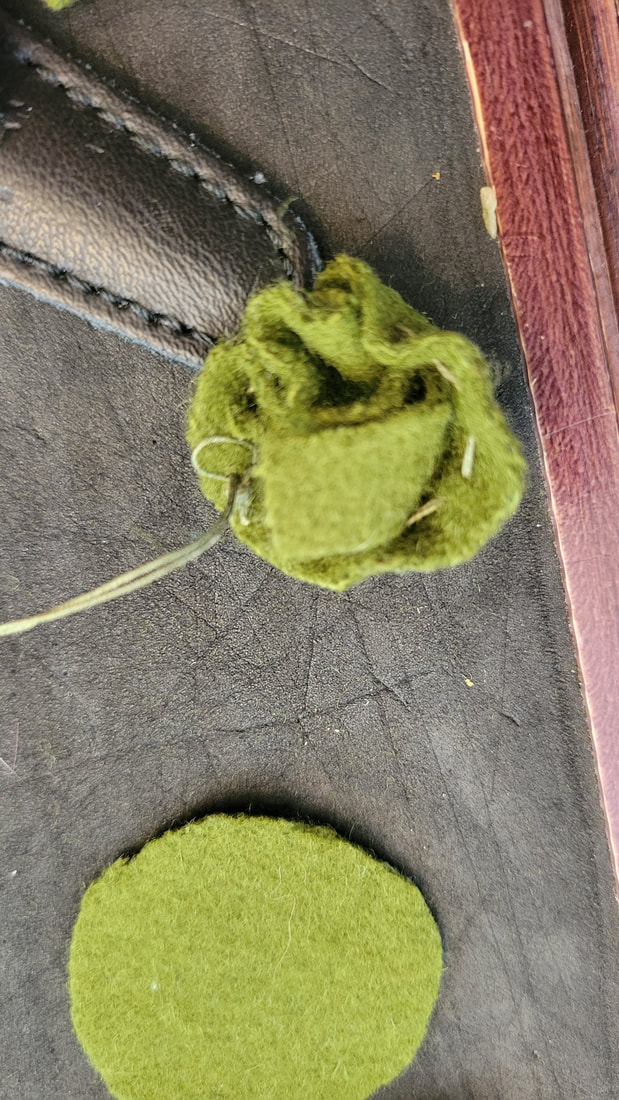
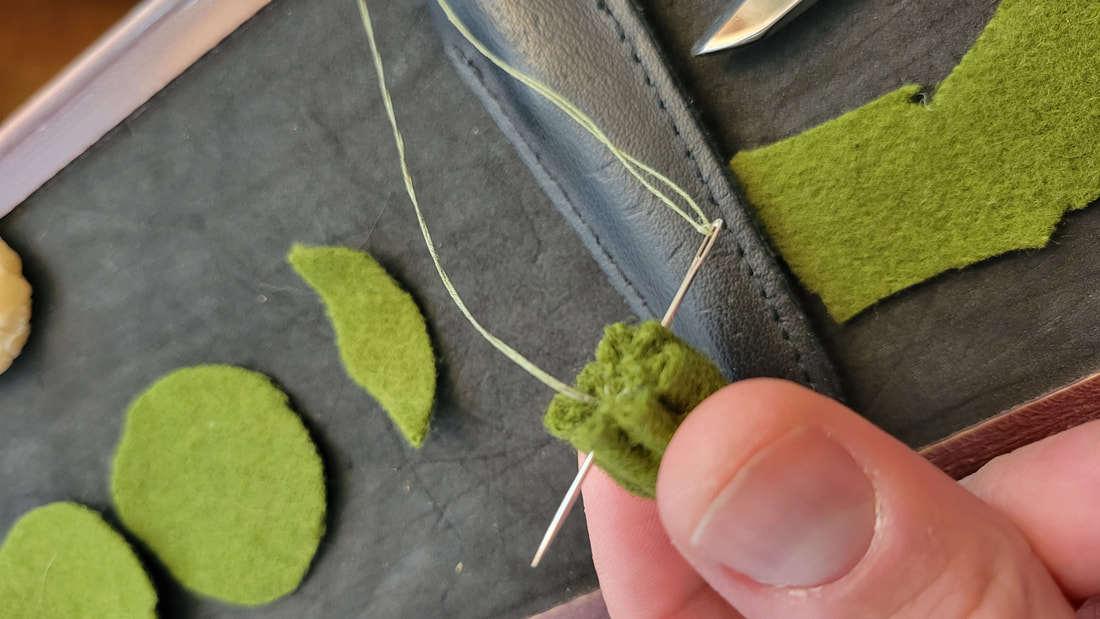
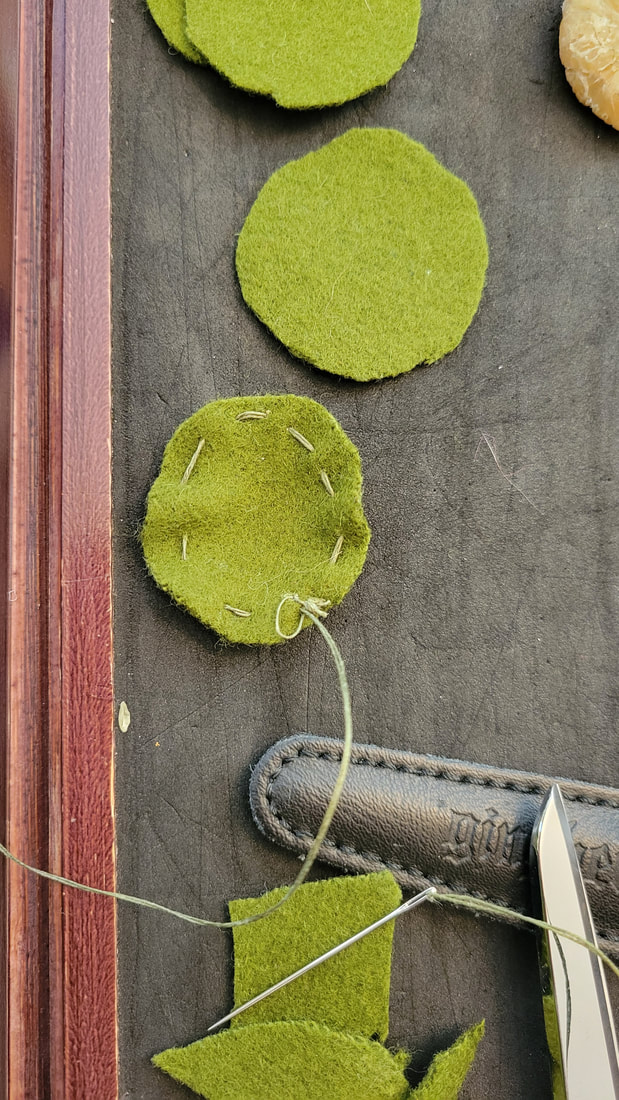
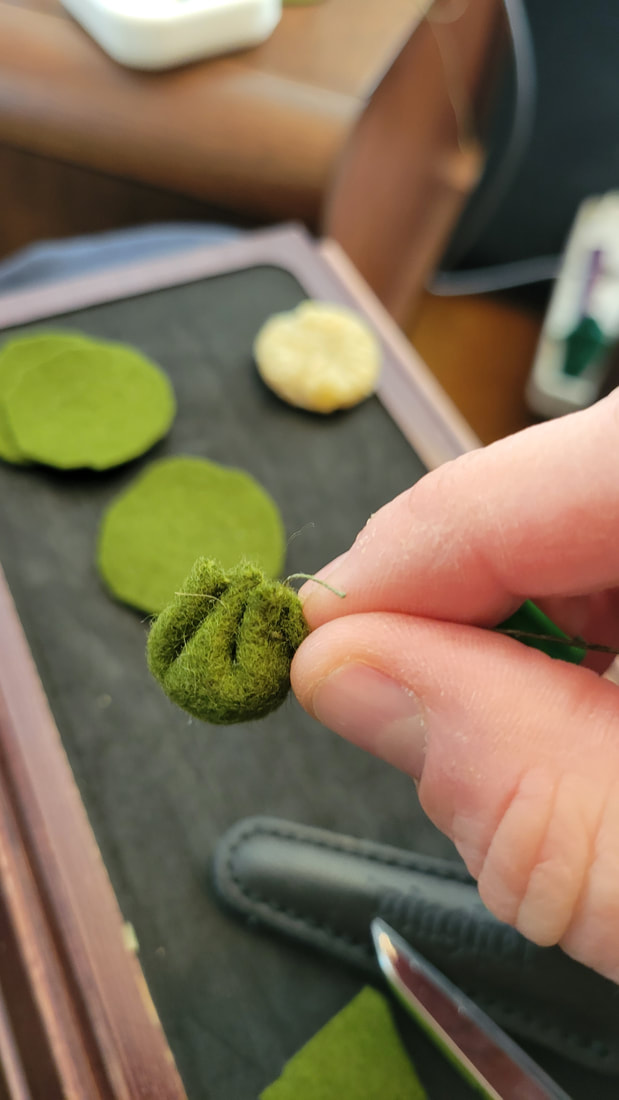
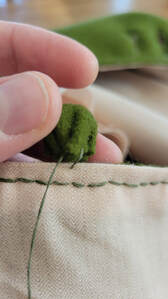
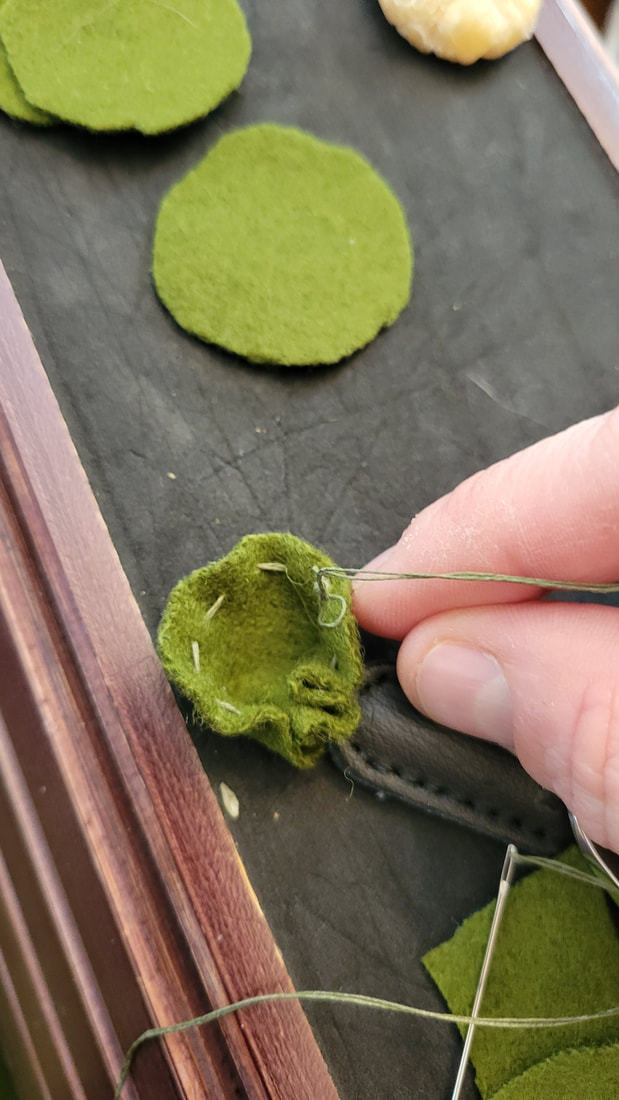
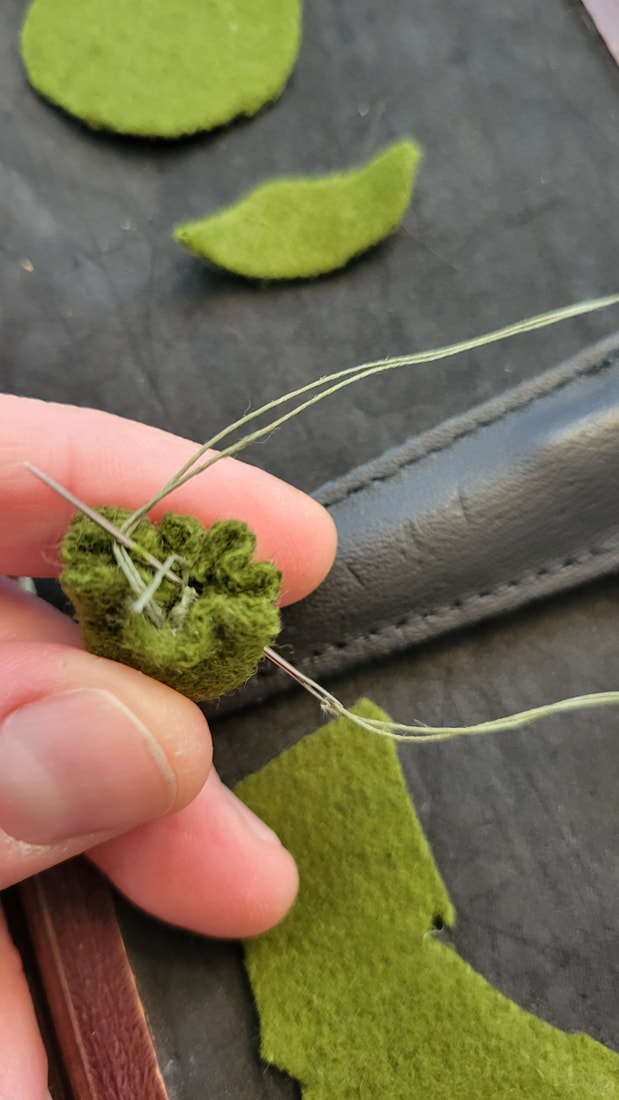
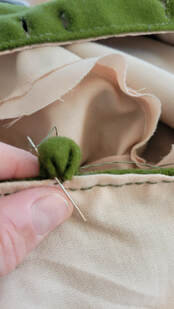
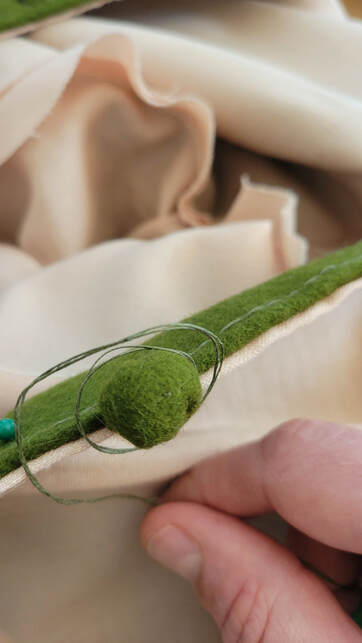
To make the buttons, you cut out circle blanks of fabric and use a running stitching around the outer perimeter. You can then start to pull the running thread to make the button bunch up. When it is mostly closed, put a small bit of scrap fabric into the well and finish closing up the button. Then stab stitch through the sides of the button and oversew to knot the stitches off. This will help seal the button closed and narrow it at the base. Without cutting the thread off, start sewing it directly on the edge of the garment then stitch through the bottom of the button and back through the garment. Repeat this process once or twice, coming from the sides of the button and trying to form a thread shank. Once you have formed a shank, wrap the thread around it two or three times and then stab through the shank and back through the garment to secure the thread. There is a balance between doing this too securely and finding that the button won’t move or is too firmly secured and finding that the button is very loose and feels like it will fall off. Experiment with your fabric and thread and see what works for you.
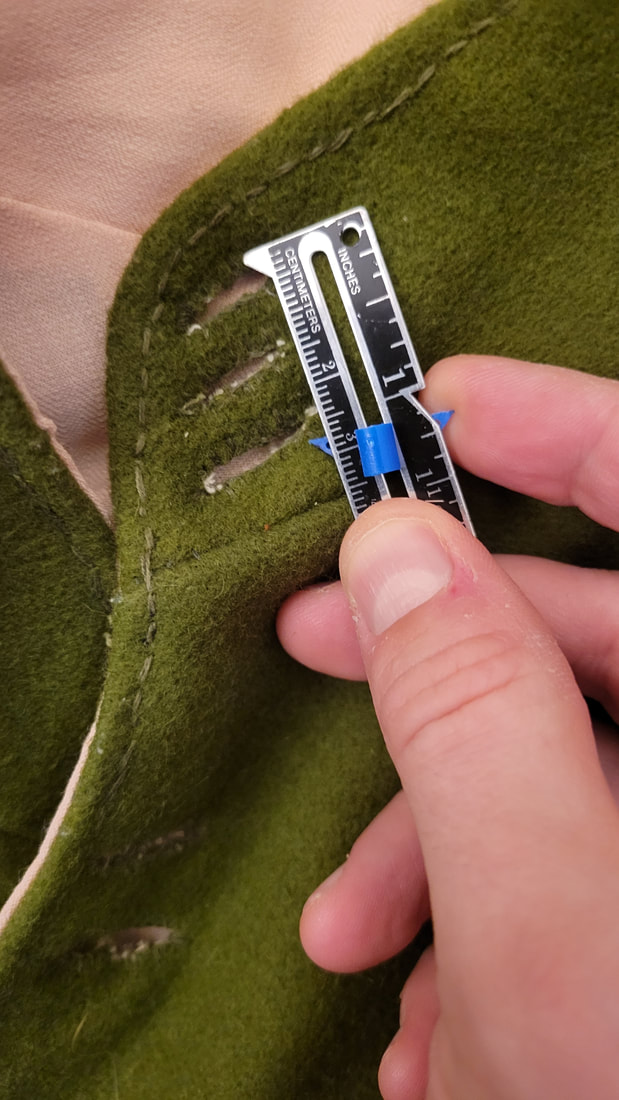
As a note, for the sleeves and the collar buttons, I decided to use three small buttons very close to each other, about 1 cm apart.
As a note, for the sleeves and the collar buttons, I decided to use three small buttons very close to each other, about 1 cm apart.
|
|
|
|
|
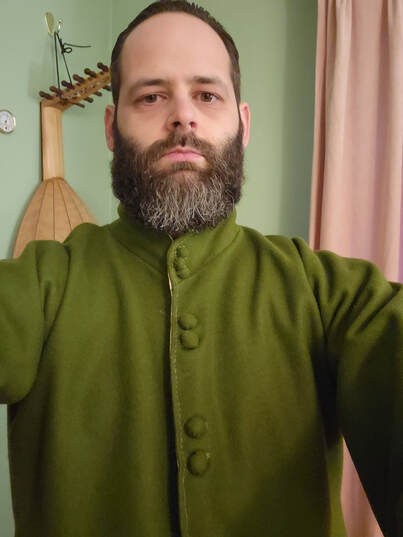
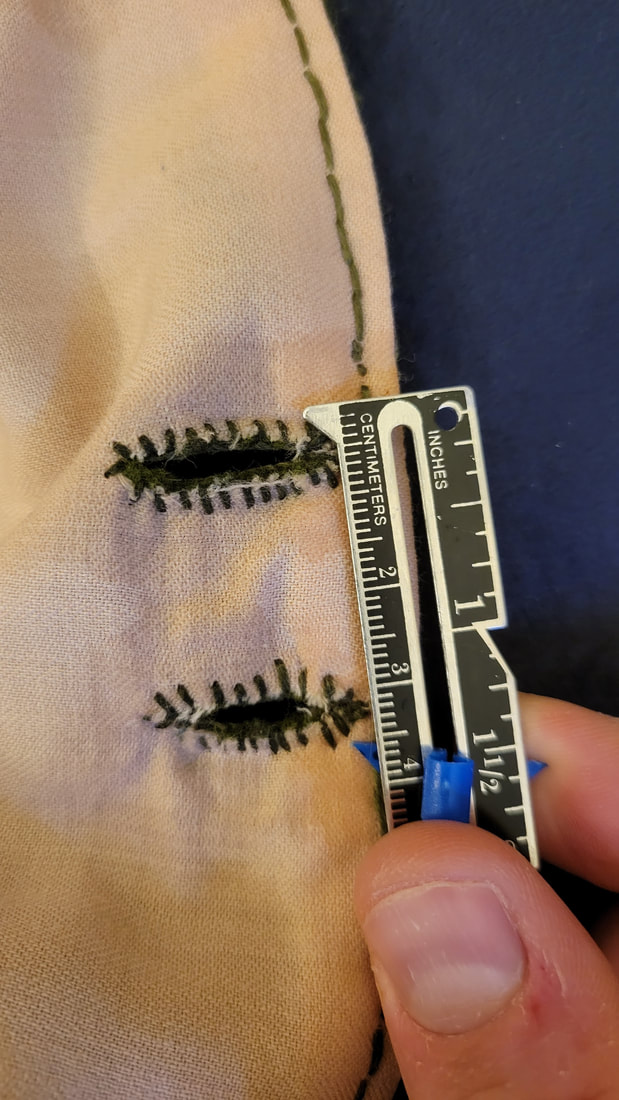
For the rest of the buttons down the front of the gown, I used a much larger button but the process for making both is the same.
The illustration my gown is based off of has pairs of buttons down the entire front. This was actually a little trickier than I thought it would be because I was unsure how to best space pairs of buttons uniformly down the front. It’s one thing to say I want 10 buttons down the front and just space them out, it’s a little different to do that with pairs of buttons.
Fortunately, my wife and I worked out a mathematical formula to figure it out based on how many button sets you want on your garment. It looks like this:
L – (BHU*n=BHT)/N
Where L is the length of the garment from the top of the top button to the bottom of the bottom button. BHT is found by determining the length of one Button Hole Unit. That is to say, if you are doing pairs of buttons, you measure the sum of that unit to get your BHU. You then multiply the BHU by the number of total button holes you want this gives you BHT. Then subtract L from BHT.
You then multiply BHT by one less than number of button pairs you want to get to get the figure for how far to space the buttons holes out.
In practice, it might look like this:
A buttonhole pair that is 2.5 cm from top buttonhole to bottom buttonhole. You want 9 sets of the buttonhole pairs. So 2.5 * 9 = 22.5. this is how much of the length will be taken up by buttonholes, the BHT. The length of the garment from top buttonhole unit to bottom buttonhole unit was 85cm. So 85-22.5 = 62.5. Now, subtract the BHT from the front to give yourself how much room is left on the garment to put buttons. So take 62.5 divided by 9 and get 6.9.
85cm – (2.5cm*9=22.5)/9= 6.9.
You now have all the information you need to mark onto your garment. Measure the top of your top button hole down 2.5cm. That is your buttonhole unit. Then measure 6.9 cm down, that is the start of your next buttonhole unit, measure 2.5cm, then 6.9cm down from that, until you have marked all of your buttonholes. Maybe this is overly complicated, but I felt like it worked for me…
Anyway, Once the buttonholes and the buttons are down, you should be finished.
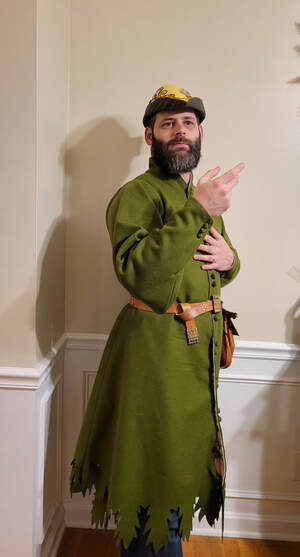
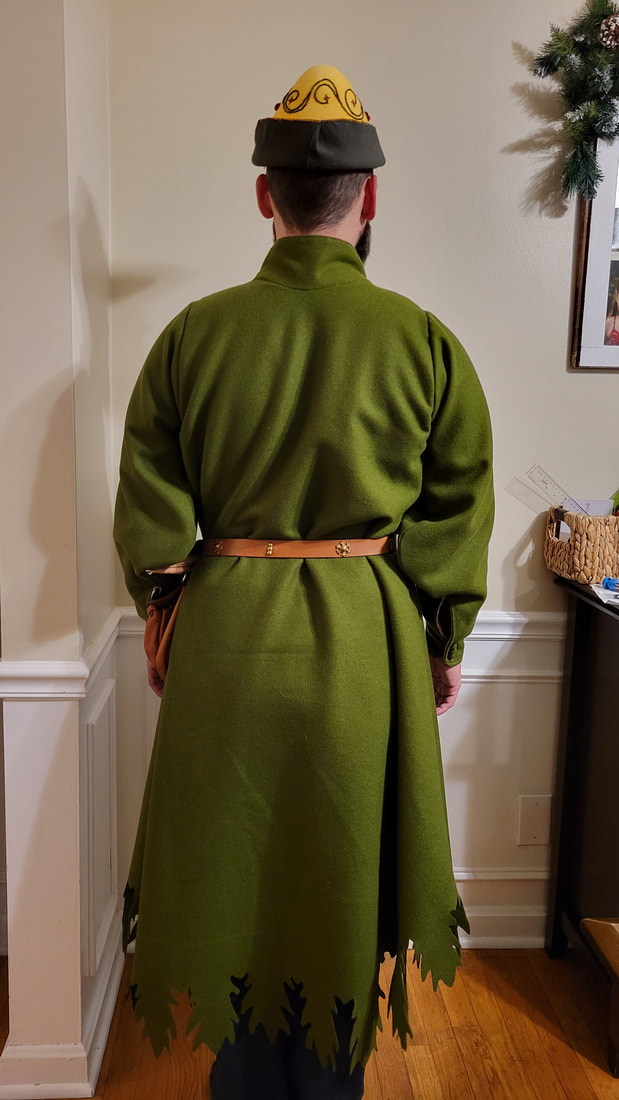
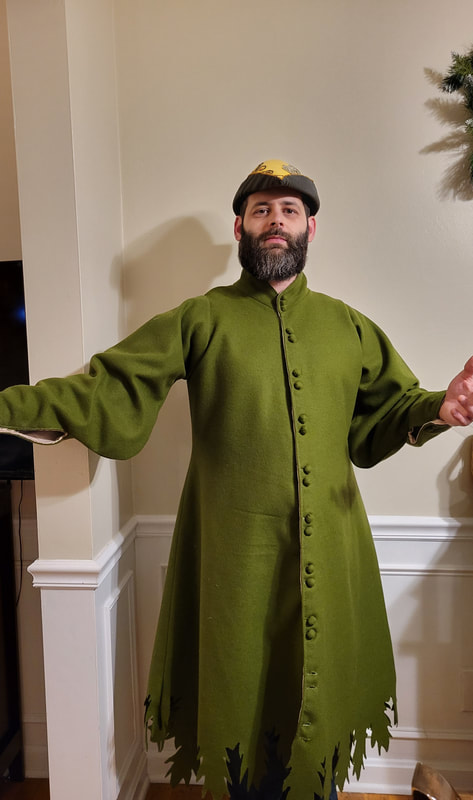
Concluding Impressions:
This has far and away been my favorite project. The wool I bought was beautiful and feels great, drapes perfectly, and is a joy to work with. I spent considerable time working on a new bodice block (weight changes) and the mockup gown based on that. I also spent hours pouring through different illuminated manuscripts and artwork trying to find inspiration for this piece and the outfit as a whole. I finally settled on the Taciunum Sanitatis and have enjoyed learning about the manuscript beyond just looking at the fashion.
I can’t even guess how many hours I spent on this, but I think the end result is well worth it. I know that the piece is not perfect, but there is nothing I would change about it and I am so happy with how it turned out.
|
|
|
